How to install a washing machine in the kitchen yourself
It's commonly believed that a washing machine placed in the kitchen area will inevitably ruin the overall appearance of the space, making it appear untidy. In fact, placing a washing machine in the kitchen can be an excellent, even ideal, layout option. With the right approach, the machine will complement the interior, making it more functional. In this article, we'll explain how to properly install a washing machine in the kitchen, what nuances to consider, and what to focus on.
Procedure
Before purchasing a washing machine, you should plan its placement and consider whether it will be built into your kitchen cabinets or permanently installed. Based on these parameters, you should select a washing machine of the appropriate dimensions. Ideally, you should consider all the details during the renovation phase.
First, you need to determine where the unit will be placed. It is best to locate the equipment close to utility lines, as this will allow for easy connection to the water supply and sewerage systems.
It's equally important to provide a separate electrical outlet protected by a circuit breaker for the washing machine. The outlet must comply with all safety regulations. Another important consideration is reinforcing the flooring where the washing machine is installed. The floor beneath the machine must be strong and level to ensure the stability of the washing machine during operation. Generally speaking, the work to be done will consist of the following steps:
Preparing the washing machine after transportation;
installation of the unit at the selected location and placement of the housing;
creating an electrical point for the device;
connecting the water intake hose to the water supply network;
connecting the machine drain to the sewer pipe.
If the washing machine is built-in, the sequence of actions will be supplemented by hanging the front panel on the kitchen cabinet. When installing appliances into cabinetry, it is important to select the washing machine very carefully; the dimensions of the machine must perfectly match the cabinet dimensions. Now that the basic plan is defined, we can move on to a detailed description of the upcoming work.
The floor under the machine
Connecting a washing machine in the kitchen area yourself is not difficult; the main thing is to follow the basic instructions. Be sure to consider the type of flooring in your kitchen. Experts do not recommend parking the machine on laminate or parquet flooring, as even a small leak can cause the flooring to swell and become unusable. Even if you're confident the machine is 100% leak-proof, remember that the debris filter will need to be cleaned periodically, and that liquid will still spill onto the floor when the drain plug is opened.
The ideal surface for the washing machine is tile or concrete. The surface should not only be waterproof but also very durable, as the washing machine tends to vibrate, rock, and bounce during operation.
Preparing the electrical network
Setting up the electrical outlet for the machine yourself can be a bit more challenging. Since washing machines draw a relatively high amount of current, a separate electrical line from the main control panel will need to be installed for them. The connection diagram will be transparent: the contact from the input is transmitted to the circuit breaker, from there it is fed to the residual current device, after which the phase is sent by wire to the outlet location.
The electrical point under the washing machine must be grounded; if it is not, the factory warranty for the unit will be void.
It's important to correctly calculate the circuit breaker rating. The circuit breaker is selected based on the current required by the washing machine. You can find this value in the technical data sheet or determine it yourself. For example, if the machine's power is 3.5 kW, divide this value by 220 V. A simple calculation yields a current of 15.9 Amps. Circuit breakers available for sale have standard ratings: 6, 10, 16, and 20 Amps. For the example described, a circuit breaker rated at 16 A would be ideal.
When selecting an RCD, keep in mind that its rating should be one step higher than that of the circuit breaker. In our case, the device's rating should be 32 A. Also, pay attention to the RCD's leakage current. When connecting the device to a dedicated line, this value should be 10 mA.
It's also important to select the correct wire cross-section. For example, for automatic washing machines with a power consumption of less than 4.1 kW, cables with a cross-section of 1.5 mm² are ideal, while for machines with a power consumption of up to 5.5 kW, the cross-section should be 2.5 mm². It's recommended to use wires with copper conductors.
And, of course, it is necessary to choose the right socket itself. When choosing, pay attention to the presence of a grounding device, maximum voltage, and rated operating current. This information can be obtained by examining the markings on the socket body. If the manufacturer doesn't provide the necessary information on the device, it's best not to purchase it; it may be poorly made and won't function properly.
Preparing the machine for installation
What should you do after the machine has been purchased and delivered to your home? Of course, remove the packaging and the protective elements from the surface of the unit. Don't forget to remove the shipping bolts. This is a very important rule, since forgetting to remove them from the housing can ruin the machine during the very first use.
The screws that hold the drum in place during transport can be easily removed with the standard wrench included with the washing machine. After removing the bolts and bushings from the housing, plug the resulting holes with the special plugs included with the machine. Once these preparations are complete, you can connect the machine to the kitchen.
Connect the inlet hose
Typically, following installation instructions, the washing machine is connected to a cold water supply. The heating element in the washing machine heats the water drawn in by the system to the desired temperature, depending on the selected wash cycle. Some users, seeking to reduce energy consumption, connect the machine to a hot water supply. However, such savings are highly questionable: the rates for cold and hot water vary greatly, so it's generally cheaper to pay for the kilowatts consumed than for the hot water.
Furthermore, drawing water from hot water pipes into the tank will negatively impact the washing results. High temperatures will quickly coagulate the proteins, making them very difficult to remove.
Let's move on to a description of the installation process for the inlet hose. It comes with the washing machine and is approximately 80 centimeters long. If this length isn't enough to connect the unit to the water supply, hoses in 1- and 3-meter lengths are available at specialized retailers.
The back of the machine has a special opening with a rubber seal, into which the water intake hose should be screwed. The union nut can be tightened by hand. If using a wrench, don't overtighten it; tighten it just half a turn.
The other end of the inlet hose is connected to the water supply system. If a special outlet is provided, it’s good; if it’s not there, you’ll have to cut in a tap. If your kitchen's plumbing is made of plastic or polypropylene pipes, you should purchase a special tee, turn off the water supply, carefully cut off a section of the pipe, and solder the fitting. If your kitchen plumbing is made of metal, you'll need to use a welding machine to install the tee.
Once the tee is installed, the faucet should be attached to it. When attaching it, wrap the threads with special thread. If the water entering the apartment is very hard or heavily polluted, you can install a special filter before tightening the faucet. This is not mandatory, but is only a recommendation.
We organize the connection to the drain
The drain hose supplied with the washing machine connects to the sewer system. If the washing machine is installed close to the kitchen sink, there shouldn't be any connection issues.
To do this, replace the existing trap with a new one, equipped with a special outlet for connecting a washing machine or other household appliance. After installing the special trap, all that remains is to connect the drain hose to the outlet. Another method is to connect the washing machine directly to the sewer system. To do this, follow these steps:
replace or cut in a new tee going to the sink;
organize a separate outlet for the SMA.
It's worth mentioning that the drain hose diameter is smaller than the outlet. Therefore, during installation, a rubber seal must be inserted into the outlet. This measure will allow you to avoid leaks in the connection and the penetration of unpleasant odors into the apartment. The cuff is simply inserted into the outlet, the hose is pushed into the rubber band, which tightly compresses it, thereby ensuring the water- and air-tightness of the system.
There are also temporary ways to connect the drain hose. You can simply lower its end into the kitchen sink every time you wash. This method is undoubtedly the fastest, but that's where its advantages end. The disadvantages of this method are far greater: the unreliable design increases the risk of water draining directly onto the floor, and the wastewater will quickly contaminate the sink.
When connecting the washing machine to the sewer system, make sure that the hose is not kinked or looped.
The drain hose bend radius should be kept to a minimum to reduce the likelihood of blockages. According to installation regulations, the bend radius of a corrugated hose should not exceed 85 cm. To securely hold the hose in its original position, special clamps can be used on the corrugated hose.
 It's commonly believed that a washing machine placed in the kitchen area will inevitably ruin the overall appearance of the space, making it appear untidy. In fact, placing a washing machine in the kitchen can be an excellent, even ideal, layout option. With the right approach, the machine will complement the interior, making it more functional. In this article, we'll explain how to properly install a washing machine in the kitchen, what nuances to consider, and what to focus on.
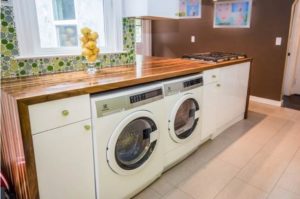 Connecting a washing machine in the kitchen area yourself is not difficult; the main thing is to follow the basic instructions. Be sure to consider the type of flooring in your kitchen. Experts do not recommend parking the machine on laminate or parquet flooring, as even a small leak can cause the flooring to swell and become unusable. Even if you're confident the machine is 100% leak-proof, remember that the debris filter will need to be cleaned periodically, and that liquid will still spill onto the floor when the drain plug is opened.
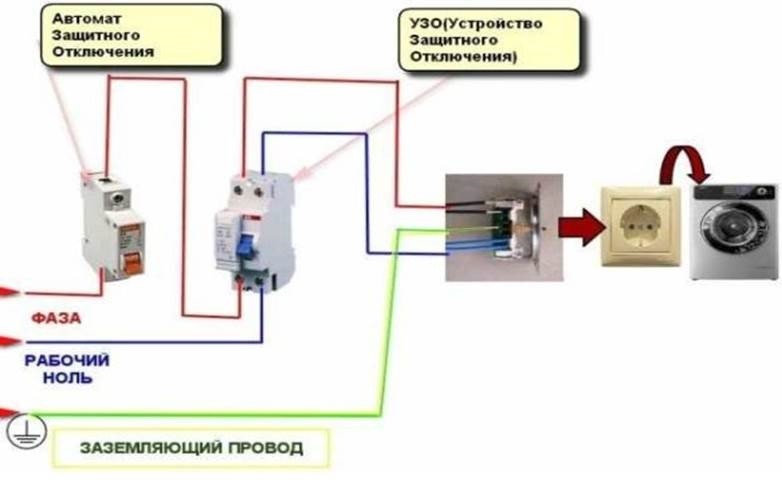
 What should you do after the machine has been purchased and delivered to your home? Of course, remove the packaging and the protective elements from the surface of the unit. Don't forget to remove the shipping bolts. This is a very important rule, since forgetting to remove them from the housing can ruin the machine during the very first use.
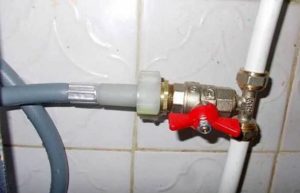 Let's move on to a description of the installation process for the inlet hose. It comes with the washing machine and is approximately 80 centimeters long. If this length isn't enough to connect the unit to the water supply, hoses in 1- and 3-meter lengths are available at specialized retailers.
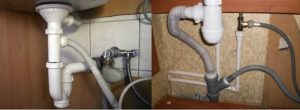 The drain hose supplied with the washing machine connects to the sewer system. If the washing machine is installed close to the kitchen sink, there shouldn't be any connection issues.
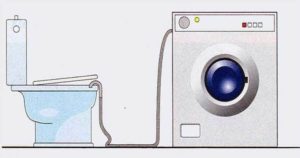 It's worth mentioning that the drain hose diameter is smaller than the outlet. Therefore, during installation, a rubber seal must be inserted into the outlet. This measure will allow you to avoid leaks in the connection and the penetration of unpleasant odors into the apartment. The cuff is simply inserted into the outlet, the hose is pushed into the rubber band, which tightly compresses it, thereby ensuring the water- and air-tightness of the system.
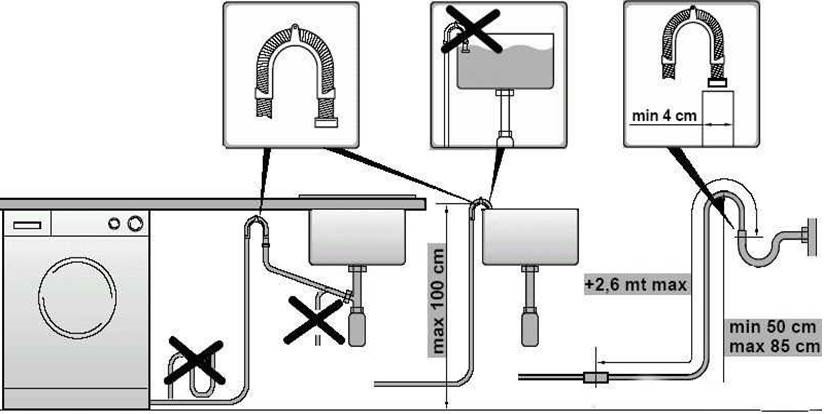


Add a comment