How to install a washing machine in the bathroom yourself
The proper functioning of a washing machine depends largely on its proper installation. It's important to choose the right location for the appliance and carefully read the instructions for connecting it to the house's utilities. Most often, users choose to install their washing machine in the bathroom, as this location is considered more convenient for its operation. This room is known for its high humidity, so it's important to follow certain rules when connecting the machine.
We choose the place carefully
Before installing a washing machine in your bathroom, you should determine the specific location where it will be installed. Regardless of the room's size and design, there are certain considerations to consider when choosing a location for the washing machine.
The unit should be located as close as possible to the building's utilities. This will allow for easy connection of the drain and water intake hoses. While the hoses can be extended if necessary, this will require additional time, effort, and money.
The machine must be placed near a power outlet so that the power cord of the appliance can easily reach the connection point.Using an extension cord is extremely dangerous and can cause electric shock to the user.
The machine's cabinet should not be exposed to excessive splashes, drips, or steam. While the machine is not susceptible to high humidity, constantly pouring water on it will inevitably damage it.
Do not place any foreign objects on the unit, as this will create additional mechanical load that will disrupt the normal operation of the device and lead to equipment failure.
The washing machine shouldn't restrict free movement. This will cause inconvenience to family members and, secondly, increase the risk of mechanical damage to the machine's body.
If the room is spacious enough, choosing a location for the washing machine shouldn't be a problem. Any available corner or unoccupied wall space can be designated for it. In modern interiors, a dedicated niche is often chosen for the machine.
If your bathroom is compact, you can place the washing machine directly under the countertop or under a sink, also known as a "lily pad." This unique design will allow the sink to blend seamlessly into the unit, saving space.
Preparing for the installation process
When choosing a location for the washing machine, be sure to analyze the walls and floor in this area; they must be strong and straight. Reliable, dry and level surfaces will provide the necessary conditions for the normal functioning of the washing machine. Damp walls will have a negative impact on the body of the unit, causing corrosion of the metal elements of the machine.
It is very important to pay attention to the floor covering; an uneven floor causes increased vibration of the washing machine during operation, and, consequently, increased wear of all system components.
So, what should you check? First, examine the surface for cracks, chips, and voids. Second, check the surface with a spirit level. If there is mold in the grout between the tiles, be sure to treat the area with special antifungal agents.
At this stage, it's recommended to consider how the unit will be connected to the water and sewer systems and measure the length of the hoses. It's crucial to take all measurements accurately to ensure the washing machine fits in its designated space.
Particular attention should be paid to the preparation of the electrical point that supplies power to the machine. The washing machine outlet must be grounded and protected from moisture, and a three-wire 16-amp device must be installed. The outlet should be connected directly to the panel; it is best to provide a circuit breaker for it. For additional safety, it is better to use voltage stabilizer for a washing machine.
The next step is to organize the communication outlets. Their design directly depends on the chosen connection method for the equipment. Review the available options and choose the most convenient and suitable one for your situation.
Connecting to the water supply
There are several ways to accomplish this. The choice of connection method will depend on the skills of the person installing the washing machine. Consider the utilities to which the connection will be made; if necessary, it's best to replace them before installing the machine. Let's look at the main methods for connecting the unit to the water supply.
If the pipes are old steel
Under these conditions, you'll need to connect directly to the water pipe. A cut-in clamp or a special compression fitting is used for this. The top of the fitting has a threaded cavity where the washing machine's water intake hose will be attached.
Additionally, the coupling comes with a guide bushing and a rectangular rubber gasket. The insertion is performed as follows:
close all faucet taps and the valve that shuts off the water supply;
clean and sand the surface of the communications where the gasket will be located until smooth;
insert the guide sleeve into the mortise clamp and fix it in the cutout of the rubber gasket;
Attach the clamp to the water pipe using 4 bolts, tighten each one in turn until the rubber band is pressed very tightly;
Using a drill with a 6 to 8 mm diameter drill bit, make a hole in the pipe wall.
Place a small container under the clamp and slightly open the faucet, this will allow the water remaining inside to flow out.
Once the liquid has drained, thoroughly clean the hole of metal filings, secure the new faucet and inspect the system for leaks. If the communications are made not of metal, but of metal-plastic, a special element - a tee-fitting - is used instead of a cut-in clamp. The procedure will be even easier: after shutting off the water in the riser, simply mark the connection point and cut off a piece of metal-plastic. Insert a fitting with built-in rubber seals into the resulting opening and attach the ball valve.
We connect to the mixer supply line
The next method requires the user to install a special straight-through valve between the eccentric and the faucet. This valve is equipped with an extension hose to the hot water system. This method is very popular due to its simplicity, and the work is relatively quick. However, all the pipes and hoses are exposed, which detracts from the aesthetics of the interior.
You can adjust a faucet made to European standards in just a few minutes. To do this:
disconnect the cold water supply hose;
screw a tee-shaped tap onto the eccentric;
Connect the mixer hose to one of the holes and the machine's inlet hose to the other.
If your bathtub faucet is from a domestic manufacturer, the procedure will be slightly different. Once disconnected, unscrew the eccentrics and install a straight-through faucet equipped with a special extension.
We connect the inlet hose to the mixer or tank
This method is the most practical and frequently used. The faucets are installed on prefabricated connections that are used to supply water to the toilet cistern, water heater, or faucet. The outlet for the washing machine is installed between the water supply riser and the faucet for the cistern or faucet.
When connecting the element to the water heater, be sure to install a straight-through valve between the pipe and the valve. Otherwise, you won't be able to start the wash cycle if the hot water supply is turned off. The activation sequence is as follows:
turn off the cold water;
turn off the tap that is responsible for its supply;
take a tee tap, wrap the external thread with FUM;
screw the part in place of the removed one;
Connect the hose from the mixer to one hole and the suction hose from the washing machine to the second.
Doing the job yourself is easy; the main thing is to carefully study the basic installation instructions and strictly follow the steps outlined in the instructions. Don't forget to observe safety precautions.
Organization of drainage
Draining wastewater from the tank is one of the most important functions of any washing machine, so it's crucial to ensure the drain pump is capable of removing excess water. The pump must discharge wastewater without additional strain, preventing it from flowing back into the washing machine's system. To achieve this, the washing machine must be properly connected to the sewer system.
Simple discharge of sewage
This method is the simplest, but not very user-friendly. The operating principle of the drainage system in this case will be primitive: one end of the hose is attached to a special hole on the machine body, the other is directed into the sink, bathtub, or toilet.
This method has one advantage: minimal time and effort. However, it has many disadvantages. First, the drain hose is not securely attached, so there's a risk it could fall and flood the room with dirty water. Second, plumbing fixtures cannot be used during the washing process. Third, the waste water contaminates the surface of the bathtub and sink, making this method of water disposal unhygienic.
We connect to the side connection of the siphon
If the washing machine is located close to the sink, the drain hose can be connected to a trap. A standard trap will need to be replaced with a special one equipped with an additional outlet. Then, simply attach the end of the washing machine hose to the outlet. The outlet is located at the top of the structure and at a slight angle, preventing wastewater from the sink from flowing into the machine's drainage system.
There are two downsides to this method: the possibility of an unpleasant odor from the sewer system getting into the machine's tank (to avoid this, it is recommended to use a water seal), and the possibility that, if the pressure is too strong, the waste water will not go into the sewer, but will rise into the sink and spill over the edges.
We connect directly to the sewer system
This method, although more labor-intensive, is significantly more reliable than the previous ones. What do you need? A tee of the required diameter with an angled elbow and a check valve for the washing machine. One part of the valve is connected to the drain pipe, and the other, through a tee valve, is attached to the sewer system.
The drain hose inlet should be at a slight angle and positioned from top to bottom to prevent waste from the plumbing from getting into it, which can spread an unpleasant odor.
Description of the installation process
First, the washing machine needs to be removed from the manufacturer's packaging and the locking bolts that prevent the drum from loosening during transportation need to be removed. It is very important not to forget to remove the stoppers, as they can cause the chassis to fail. The bolts can be removed using an open-end wrench. They are pulled out of the washing machine housing along with the bushings, and specially designed plugs are inserted into the resulting holes.
The locking bolts must be kept for the duration of the machine's warranty period, as well as in case the unit needs to be transported for personal purposes.
Place the washing machine in the chosen location and place a level on the top wall of the unit. If the machine is uneven, adjust its feet to ensure levelness. There's no need to place the washing machine flush against the wall, or against furniture or plumbing fixtures; if they're positioned on either side of the unit, be sure to leave a small gap.
Move the automatic washing machine forward a little; this will make it easier to connect it to the utilities.
Connect the drain and inlet hoses to the house utility networks using any of the methods described above.
Insert all hoses into the specially provided recesses of the washing machine to prevent them from kinking.
After completing all the steps, the unit is moved to its original position, installed in its permanent location, and leveled again. Finally, all that remains is to plug the machine in and test its functionality by running the test mode.
First launch
When running a test program, be sure to take the appliance's technical data sheet and keep it in front of you. You'll need it to verify the data. The test program doesn't involve loading laundry into the drum; it only involves water and detergent.
First, turn on the water intake into the washing machine's tank. Time the time it takes for the drum to fill to a certain point. Be sure to inspect the systems for leaks, and if any are found, drain the fluid and seal the problematic connections. If there are no leaks, continue checking the unit. The water should heat up to the specified temperature in 5-7 minutes. Compare the measured time with the time specified in the technical data sheet.
When operating normally, the washing machine should operate silently; any unintelligible creaking, knocking, or rustling sounds during the water heating stage indicate a problem with the system.
If the machine is functioning properly and is virtually silent, continue with a test run, examining its other functions and capabilities, including the drainage system. After the cycle is complete, inspect all pipes, connections, walls, and the flooring around the appliance again—everything should be dry.
Possible problems
Sometimes, after a test wash, all the connections and pipes of the appliance remain dry, but there's water on the floor. This can happen if the dirt filter isn't screwed in all the way. It's located underneath the machine, behind a false panel, or in a special dirt filter compartment. By tightening it more securely, you can eliminate this problem.
If your washing machine vibrates, rattles, and rocks excessively while in the "Spin" mode, it may be installed unevenly or the flooring may be unsuitable. Another possible cause is loose counterweights. If the machine is new, it's best to call a professional to fix this manufacturing defect. However, if the warranty period has expired, you can tighten the counterweight bolts yourself by removing the top cover.
If all installation instructions have been followed, but the washing machine is displaying serious errors, such as not turning on, not starting a wash, or not adjusting the selected mode settings, it's best not to delve into the machine to find out the cause, but to return it to a service center with the warranty card.
 The proper functioning of a washing machine depends largely on its proper installation. It's important to choose the right location for the appliance and carefully read the instructions for connecting it to the house's utilities. Most often, users choose to install their washing machine in the bathroom, as this location is considered more convenient for its operation. This room is known for its high humidity, so it's important to follow certain rules when connecting the machine.
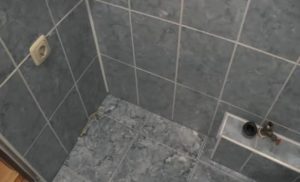 Using an extension cord is extremely dangerous and can cause electric shock to the user.
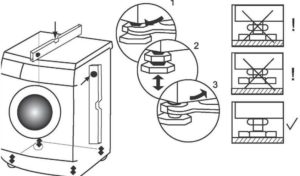 So, what should you check? First, examine the surface for cracks, chips, and voids. Second, check the surface with a spirit level. If there is mold in the grout between the tiles, be sure to treat the area with special antifungal agents.
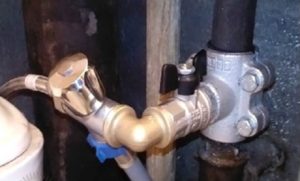 Under these conditions, you'll need to connect directly to the water pipe. A cut-in clamp or a special compression fitting is used for this. The top of the fitting has a threaded cavity where the washing machine's water intake hose will be attached.
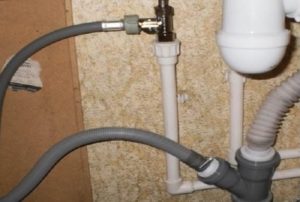 The next method requires the user to install a special straight-through valve between the eccentric and the faucet. This valve is equipped with an extension hose to the hot water system. This method is very popular due to its simplicity, and the work is relatively quick. However, all the pipes and hoses are exposed, which detracts from the aesthetics of the interior.
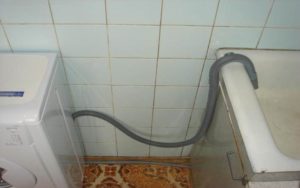 This method is the simplest, but not very user-friendly. The operating principle of the drainage system in this case will be primitive: one end of the hose is attached to a special hole on the machine body, the other is directed into the sink, bathtub, or toilet.
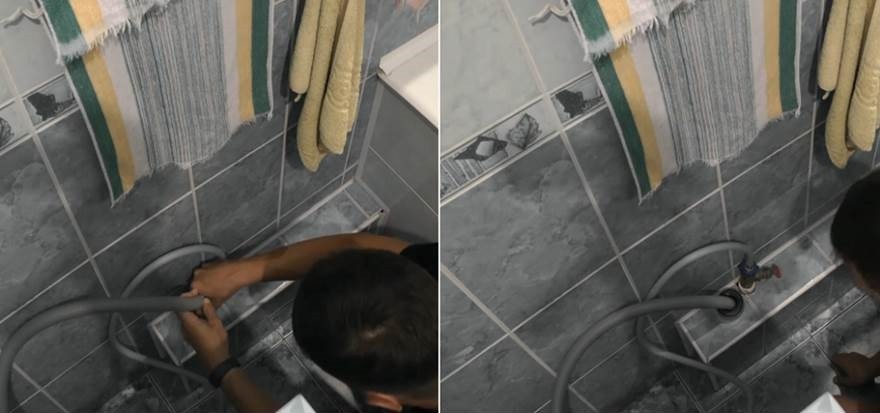


Add a comment