If your washing machine stops heating and displays an error code related to the heating element, it means the heating element is broken. The system will continue to run high-temperature cycles, but the temperature will remain at a low temperature. Over time, this "idle" operation will affect the control board, causing it to freeze and malfunction. Operating a washing machine with a faulty heating element is dangerous; it must be replaced immediately. Let's look at how to remove and install a heating element in a washing machine.
We are changing the part
Before you begin installing the heating element, you must remove the old one. Most often, the heating element is located under the washing tank at the back of the machine, but on some models of washing machines, access to the element is only possible from the front. The device's location doesn't affect the replacement procedure, as the basic algorithm remains the same. Accessing the heating element requires several stages of disassembly.
Disconnecting from utilities. First, disconnect the washing machine from the power supply, sewer, and water supply.
Emptying the tank. Use a screwdriver to pry open the access door, place a container underneath, unscrew the waste filter, and drain the water from the drum. Once the flow subsides, tilt the machine forward to drain any remaining liquid.
Removing the panel. If the heating element is located on the front, remove the front panel of the housing; if on the back, remove the rear panel. Typically, removing a few bolts around the perimeter of the panel and detaching it from the circuit breaker is sufficient.
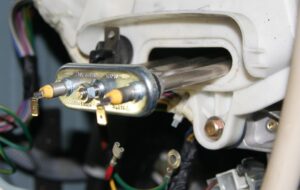
Finding the heating element. It's located under the washing machine's tub. Its "feature" is visible to the user—a round plate with connected wires. There are three terminals: phase, neutral, and ground. A temperature sensor is also connected to the heating element.
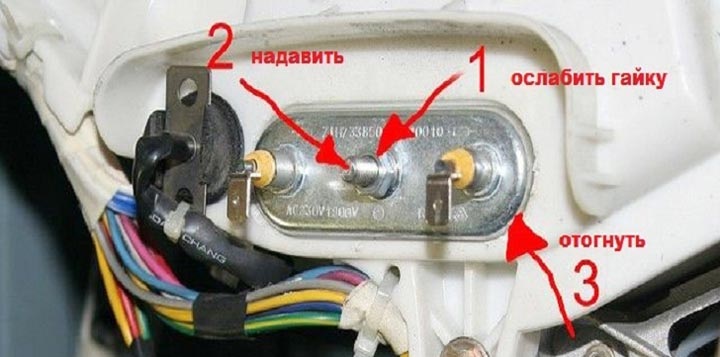
Disconnecting the wiring. Disconnect the phase and neutral terminals, loosen the ground nut, and disconnect the other contacts.
Take a photo of the wiring before disconnecting it - this will help you connect the terminals correctly when reassembling!
Checking for proper operation. It is recommended to verify the heating element is faulty before dismantling. Step-by-step instructions are provided in the next section.
If the heater is working properly, disassembling the washing machine won't fix the problem—the cause lies elsewhere. You can try testing the electronics, but only if you have the necessary knowledge, experience, and equipment. It's best to play it safe and contact a service center for a full diagnosis. It's important to understand that the cost of a new control module can often reach 50-60% of the machine's price. At the same time, the board remains extremely vulnerable to external influences—one careless move will result in the component being irreparably damaged. Is the heating element broken? Then we continue disassembling.
Loosen the central nut. Loosen the ground screw, but not all the way—just enough to loosen the threads. Then, countersink the nut to move the rubber seal. The seal ensures the heater's seal and is pressed against the coil when tightening the fasteners.
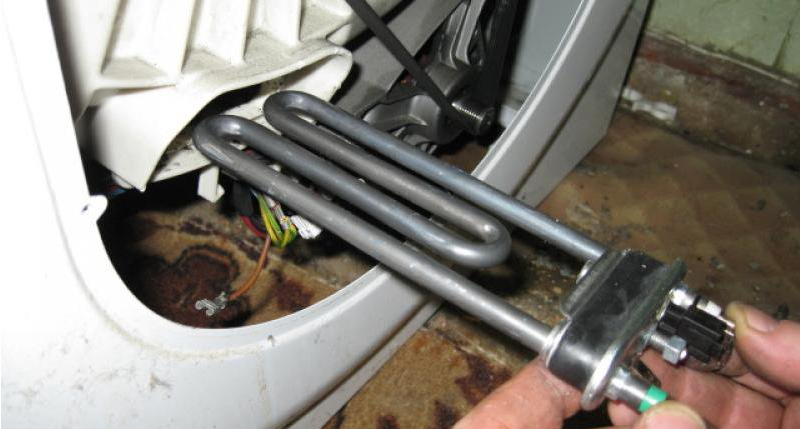
Removing the heating element. Carefully pry the heating element housing around the entire perimeter with a screwdriver and detach it from the seal. If the rubber seal is stuck to the element, do not use force. Instead, treat the seal with WD-40 and wait 15-20 minutes. Afterward, the element will easily slide out of its seat.
The next step is to purchase a new heating element. Experts recommend taking your old heater with you to the store and presenting it to the sales staff as a sample. Then the chance of error will be extremely low. Incidentally, finding a replacement can be quite challenging: manufacturers produce a multitude of models, varying in size, design, and shape. It's better to be on the safe side and use a specific example.
When choosing a new heating element, you need to focus on the power, shape and size of the heater, as well as the serial number of the washing machine.
Once you have selected a new heating element, you can begin installing and connecting it:
clean the seat and seal from scale;
loosen the central nut;
fix the heating element in the grooves;
tighten the bolt;
connect the wiring (to connect it correctly, refer to the photos taken earlier).
Once the replacement is complete, reassemble the washing machine and connect it to the power supply. Then, run any high-temperature mode. Wait 10-15 minutes, interrupt the program, and check the heating element for proper operation. If the heating element is warm and there are no leaks around it, the repair was completed correctly.
Check the old part
A new heating element is expensive, so before replacing it, it's important to verify the old one is faulty. Diagnostics don't require removing the unit from its housing—it's possible to evaluate the element's functionality on-site. The key is to have a multimeter or other device capable of measuring resistance and current.
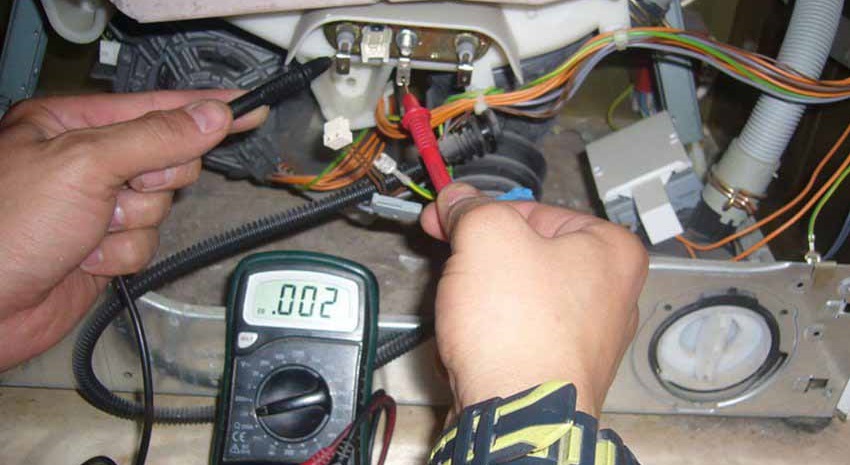
To ensure the heating element is working properly, it must be checked three times. First, check for a break in the nichrome connection. This is the most common cause of heating element failure, as the coil burns out and current stops "circulating" through the element. This suspicion is confirmed by a "continuity test":
turn on the multimeter to the “Resistance” mode;
we connect the tester probes to the heating element terminals;
We look at the display: if the arrow stops at “0”, the coil has burned out.
Before using the multimeter, make sure it is in good working order!
The second step is to check the heating element for a breakdown, especially if there's no grounding in the living space. A broken heating element is very dangerous – it causes current leakage, and the circuit breaker housing becomes energized, which can lead to electric shock. Most washing machines experience minor breakdowns, but more serious consequences are possible. Diagnostics in this case are as follows:
one probe of the multimeter is connected to the terminal of the heating element, the second to the metal spiral;
the value is set to “200 Ohm”;
the result is assessed on the scoreboard (normally the arrow should stop at “0”, if there are any deviations, it is replaced);
the machine is connected to the network for a few seconds;
the test is repeated (sometimes the breakdown is recorded only after the heating element has heated up).
The third step is checking the power. This is optional, but helpful: it helps assess the degree of wear on the part. First, calculate the current for a specific heater by dividing the rated power by the line voltage. For example, a 1900-watt heating element and a 220-volt line require a minimum of 8 A. Once the required current is calculated, set the multimeter to ammeter mode and take measurements. If the needle points to the resulting value, the device is in good condition. If the deviation is too great, critical wear has been detected. In the latter case, the heater will not last long; it is best to replace it as soon as possible.
Why does the heating element break?
The heating element is considered one of the most vulnerable parts of a washing machine. While it can sometimes last 10-15 years without failure, it often fails within the first year. There are many reasons for premature failure, ranging from manufacturing defects to improper use of the washing machine. Let's examine each malfunction in more detail.
Manufacturing defects. This includes the manufacturer's use of low-quality spare parts. Heating elements are typically not manufactured with the machine but purchased separately from suppliers. While some companies meticulously inspect third-party parts, others often opt for cheaper options.
Power surges. The electricity supplied to an apartment isn't always stable: problems at power stations or weather conditions cause sudden drops and surges in current. This can eventually cause the heating element, the wires connected to it, or part of the control board to burn out.
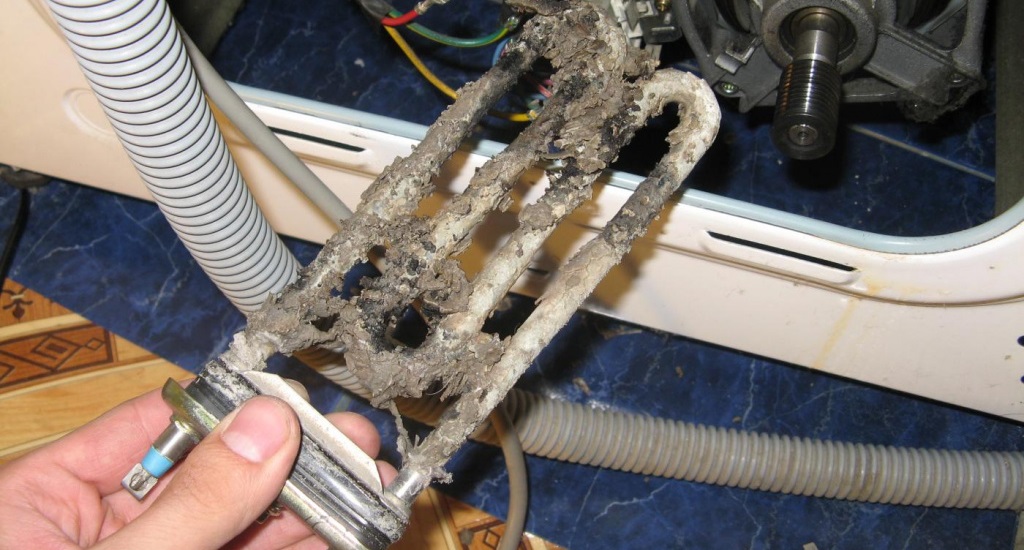
Water that's too hard. Tap water in city apartments often contains elevated calcium levels. At high temperatures, this calcium hardens, depositing on the heater body, creating scale. Limescale deposits impair heat transfer, reduce the efficiency of the device and cause overheating of the nichrome coil. As a result, the heating element cannot withstand the heat and burns out.
Do not run more than two high-temperature cycles in a row - the heating element may overheat and fail!
Heating element overload. Running several high-temperature cycles in a row also leads to overheating. It is recommended to let the machine rest for 15-30 minutes after every two "hot" cycles.
If the old heating element is broken, it's essential to install a new one as soon as possible. Otherwise, not only will the washing quality suffer, but the machine itself will also malfunction—the control board may freeze and malfunction.
 If your washing machine stops heating and displays an error code related to the heating element, it means the heating element is broken. The system will continue to run high-temperature cycles, but the temperature will remain at a low temperature. Over time, this "idle" operation will affect the control board, causing it to freeze and malfunction. Operating a washing machine with a faulty heating element is dangerous; it must be replaced immediately. Let's look at how to remove and install a heating element in a washing machine.
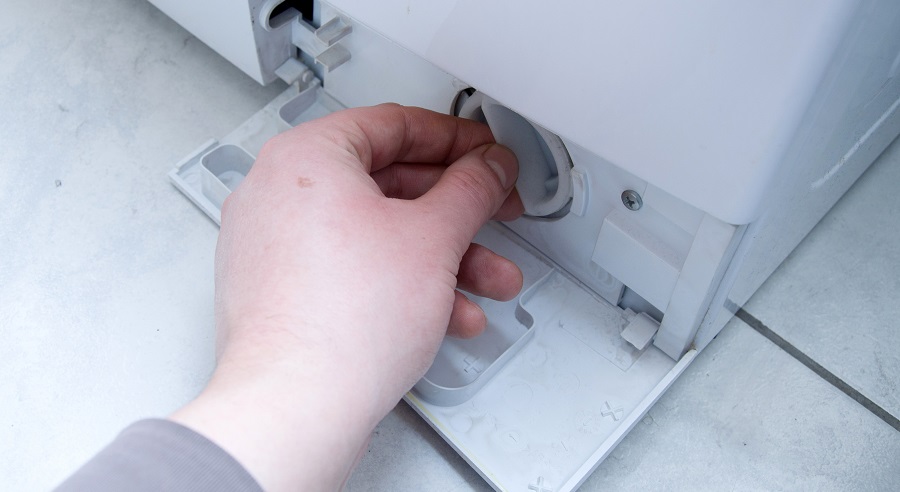


Add a comment