Installing an Electrolux dishwasher yourself
 The current prices of dishwashers are simply discouraging for many buyers, and when you consider the installation fee, it's downright depressing. There is a solution. It's not easy, but it's a chance to prove yourself. You can install an Electrolux dishwasher yourself. Just make sure you do it right to avoid damaging the appliance and voiding the warranty. What's the "right" way, you ask? Read the instructions in this article, and everything will become clear.
Preparing the site
Novice installers rush into installing an Electrolux dishwasher, neglecting the site preparation stage. They then encounter problems during installation that could have easily been avoided if the site had been properly prepared. For some reason, some people think that site preparation is only necessary for the installation. built-in dishwasher, but in reality, you should always take care of the place.
First of all, you need to think about how to position your new “home assistant” so that it is conveniently located and close to utilities. Keep in mind that the distance to sewer and water pipes should not be more than 3 m; ideally, the shorter the distance, the better. In addition, you need to ensure that:
- there was a solid and level base under the dishwasher;
- a cold water connection point was set up;
If you are going to connect to hot water, make sure that this is permitted by the manufacturer's instructions.
- a connection point to the sewerage system was organized;
- The dishwasher could be powered from a reliable outlet directly or (preferably) through a voltage stabilizer.
The foundation needs attention when your kitchen floor is completely rotted and the foundation is heavily sagging and creaking. If you have a regular floor, even with minor unevenness and differences in height, it will be fine. Next, we move on to installing the cold water outlet. At this stage, it's enough to ensure that the tee fitting fits under the sink between the faucet outlet and the cold water pipe, and that the dishwasher hose can easily reach there. We'll describe the faucet installation process a little later.
Next, check the distance from the trap to the dishwasher. The drain hose will connect to the side outlet of the trap, so it needs to be long enough. If the hose is too short, you'll have to extend it, which is a hassle. If you have a trap without a side outlet, or the outlet is already occupied by a washing machine, you'll have to buy a trap with a free outlet or run the drain hose directly over the edge of the sink, which is extremely unsightly.
After that, we check the outlet. The outlet must be reliable and able to withstand the rated load of the dishwasher with plenty of reserve. It's better to connect through a power strip rather than directly. dishwasher stabilizerThis device can prevent damage to the dishwasher's electronics in the event of a power surge.
A built-in dishwasher must fit neatly into the niche. To do this, measure the machine's body, taking into account any protruding parts, and then compare these dimensions with the dimensions of the niche where you plan to install your "home helper." In this case, relying on the manufacturer to specify the dimensions of their product in the specifications is pointless.
Let's prepare everything we need
Installing an Electrolux dishwasher requires a few tools and components. Tooling is the least hassle. You'll only need a screwdriver, pliers, an adjustable wrench, and a spirit level. Consumables are a bit more involved. You'll need to purchase:
- FUM, PVC insulating tape, sealant.
- Siphon with a branch for connecting a drain hose (nipple).
- ¾ tee tap made of brass or bronze.
- A flow-through filter with a mesh to prevent large debris from the water supply from getting into the dishwasher.
- Tee for a sewer pipe (if the sewer outlet was not arranged in advance).
The list of components significantly expands and becomes more expensive if the electrical connections haven't been properly prepared in advance. If there's no proper electrical outlet, you'll need to purchase:
- three-core electrical cable for 2.5, copper (the length must be sufficient to reach the panel);
- moisture-resistant socket of European standard;
- 16A residual current circuit breaker for line protection;
- voltage stabilizer (optional).
If you need to rework the communications, you will need a hammer drill to prepare the groove, an indicator screwdriver, and nippers. If you don't have any experience with electrical wiring, it's best to entrust this task to a professional, but don't leave everything as is. The dishwasher must not be connected to an old outlet or an extension cord, as this is dangerous.
Progress of work
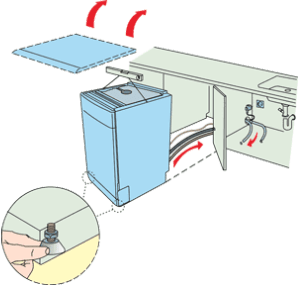
Installing an Electrolux dishwasher yourself is easy, especially when you've got everything you need and carefully selected the location. Here's a step-by-step guide.
- Connect the drain hose. Move the dishwasher closer to the installation location, and then connect the free end of the drain hose to the drain outlet, removing the plug first. If necessary, you can seal the connection with sealant, but this is usually not necessary.
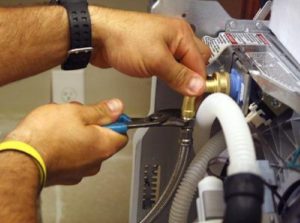
- Connect the water. Turn off the cold water. Disconnect the faucet outlet from the cold water pipe. Connect the tee to the flow-through filter. Screw the tee on, making sure to insulate the connections with FUM. Screw the pipe to one end of the tee, and the faucet outlet to the other. One outlet remains free, to which we screw the dishwasher's inlet hose. Screw the other end of the hose to the dishwasher.
- Connecting to a power outlet. It's simple: just plug the power cord into the outlet. First, slide the dishwasher into place and adjust its feet until it's level.
That's it, your DIY installation of your Electrolux dishwasher is complete. If you're using a built-in dishwasher, you'll still need to attach the door panel. This isn't difficult, as the panel is attached using special brackets without tools. The job is done!
Interesting:


Readers' comments
Headings
Washing machine repair


For buyers


For users


Dishwasher


Add a comment