How to install an AEG washing machine?
 In fact, installing an AEG washing machine yourself is quite easy. However, a potential problem arises because the manufacturer often prohibits users from connecting the machine themselves, as failure to do so will void the warranty. It's crucial to clarify this at the store when purchasing the washing machine. If there are no restrictions on self-installation, you can begin. We'll explain where to begin and how to properly connect the machine to your home's utilities.
Initial actions
When the courier delivers the washing machine, carefully inspect its body once again. Damage to the appliance often occurs during transportation. Therefore, you should only sign the acceptance certificate after ensuring that the appliance has arrived intact and in good condition.
After the courier leaves, let the machine sit at room temperature for a few hours. During this time, it's a good idea to read the user manual. The washing machine manual contains all the necessary information: connection, operation, and maintenance instructions.
First, remove the transport bolts from the automatic machine body.
The locking bolts are located on the rear panel. They are used to secure the tank so it doesn't move during transport and damage the washing machine's frame and internal components. Running the automatic washing machine with the shipping bolts in place can cause serious damage to the equipment. Such damage will not be covered by the warranty.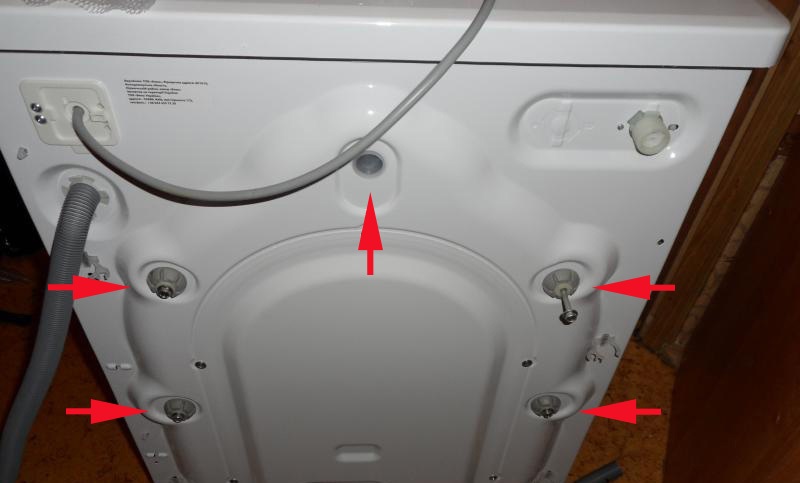
To remove the transport screws, you'll need a wrench of the appropriate size or pliers. Once the bolts are removed, the resulting holes must be sealed with the special plugs included with the machine.
Space for a washing machine
Before installing the appliance yourself, it's important to choose the optimal location. Typically, a washing machine is installed either in the kitchen or bathroom. This is convenient, as all the house utilities are nearby. Typically, the location is chosen long before purchasing the appliance. The available space is measured, and an automatic machine of the appropriate dimensions is selected. When purchasing built-in appliances, be sure to consider the front panel. The cabinet door should be the appropriate size and hang easily on the special hinges of the washing machine.
The floor under the washing machine must be level, hard and durable.
It's important to understand that the floor under the washing machine must be strong and level. Ideally, it should be concrete or tile. If you plan to install the machine on planks, they should be properly reinforced first. It's best not to place the washing machine on laminate flooring, as even a small leak can cause the surface to bubble.
When choosing an installation location, make sure the inlet hose and drain hose are long enough to connect the washing machine to the water supply and sewer system. Once you've verified that the machine will fit in the designated area, you can proceed with the installation.
Properly organize the power supply
It is equally important to plan how the washing machine will be connected to the electrical network. According to regulations, an automatic machine must be provided with a separate grounded outlet with the required voltage. The electrical point must have a moisture-proof cover.
The power cord of AEG washing machines is approximately 1.5 meters long. Therefore, the power outlet should be located near the machine. It's best not to use an extension cord, as this is not recommended by washing machine manufacturers. The safest option is to plug the washing machine directly into the electrical outlet.
Many homeowners experience a similar problem: an unpleasant tingling sensation when touching a running washing machine. Grounding the electrical outlet helps prevent these minor electric shocks. This prevents voltage from reaching the washing machine's body, making it even safer to use. While these minor electric shocks don't pose a serious threat to humans, it's still best to avoid the discomfort by installing a grounded outlet.
Water supply
The biggest challenge for users who decide to install their washing machine themselves is arranging the connection points to the pipes. However, if you follow the instructions, this shouldn't be a problem. AEG washing machines are almost always connected to a cold water supply. Each washing machine is equipped with a heating element. There are a couple of models that can be connected to a hot water supply, but this is rather questionable.
The disadvantages of connecting a washing machine to a hot water supply are obvious:
- Such water is more contaminated. As a result, the filters and internal pipes of the machine will become clogged and dirty faster;
- Hot water is harder. Limescale deposits on the machine's parts will form much faster;
- Due to increased hardness, the quality of washing deteriorates and the consumption of detergents increases.
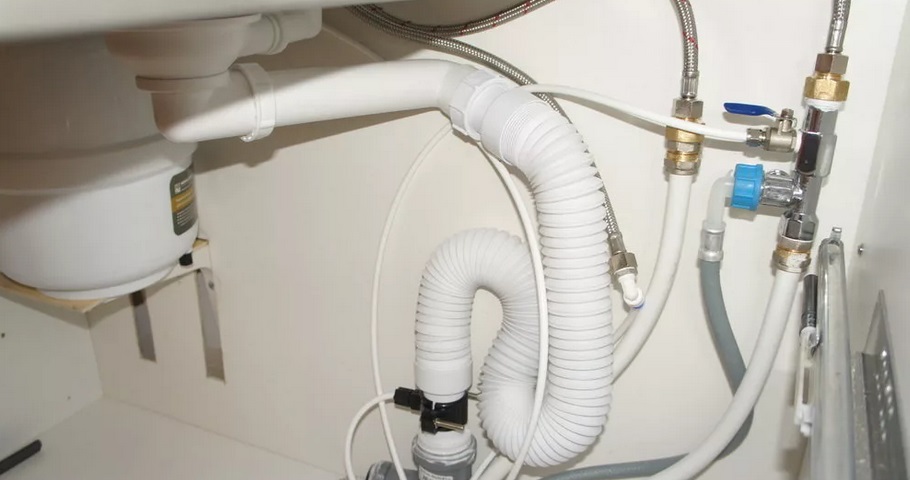
Therefore, it's best to connect your automatic washing machine to cold water. The heating element will do its job perfectly, heating the water to the desired temperature. If your apartment already had an automatic washing machine, the new "home helper" will be easy to connect to the old outlet. After attaching the inlet hose, all that's left to do is open the shutoff valve and check for leaks at the connection point.
Things are a bit more complicated when the taps aren't prepared. Then you'll need to cut into the pipe, install a special tee, and then connect the washing machine's inlet hose. When connecting your automatic washing machine to your home's utilities yourself, you need to know the following:
- You should use the inlet hose that comes with the kit;
- the standard pressure in the water supply system should be within 0.5-8 atmospheres;
- It is essential to provide a shut-off valve that can be used to shut off the water supply to the machine.
Tip for the future: It's always best to keep the shutoff valve closed and open it just before starting the wash cycle. This will prevent leaks.
Sewage disposal
The final step is connecting the washing machine to the sewer. Some users avoid this and simply direct the drain hose into the bathtub or sink, where the used soapy water drains. The only advantage of this method is that it eliminates the time-consuming installation of a corrugated pipe. However, there are many disadvantages: firstly, it's unsightly. Secondly, this drainage method is unhygienic—the walls of the plumbing fixtures quickly become dirty, requiring constant cleaning. Thirdly, there's a risk of snagging the hose, causing all the water to spill onto the floor.
It is best to connect the washing machine drain hose through a separate siphon fitting.
Almost all modern siphons have a special outlet for the washing machine—a nipple. It's normally covered with a cap. To connect the drain hose, remove the cap, insert the end of the corrugated pipe into the opening, and tighten the connection with a special clamp. The instructions for the equipment provide detailed instructions on how to connect the drain hose. The drain hose must be positioned at a certain angle to prevent foul odors from the sewer from entering the machine.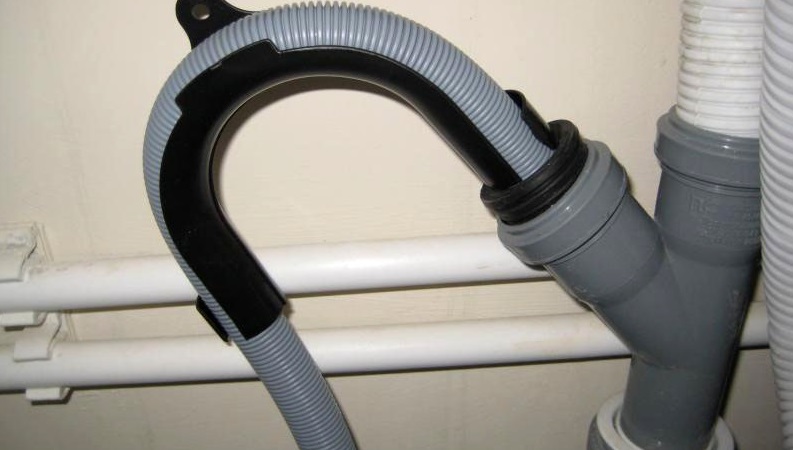
If you carefully read the instructions for your appliance and follow all the recommendations, you can easily install the washing machine yourself. Once the connection is complete, all that's left to do is run a test wash with an empty drum. Monitor the first cycle closely to ensure any leaks or other malfunctions are immediately detected and addressed promptly.
Interesting:


Readers' comments
Headings
Washing machine repair


For buyers


For users


Dishwasher


Add a comment