Install a Weissgauff washing machine
 Selecting and purchasing a new "home assistant" is only the first step. Next comes installation, connection to the utilities, and a test run. It's important to follow a few recommendations to ensure proper operation.
We'll tell you how to install a washing machine yourself. We'll also explain how to properly connect the appliance to the water supply and sewer system. We'll also explain how to start the washing machine for the first time.
Prepare for work thoroughly
Installing a washing machine can be a hassle. However, if you follow all the recommendations, you won't encounter any problems. Anyone can install a washing machine; you just need to understand the connection process. Here's what you need to do:
- remove the factory packaging, remove the protective stickers from the washing machine body;
- let the washing machine “stand” at room temperature for a couple of hours;
- carefully study the instructions for the equipment;
- select a suitable location for installation;
- remove the transport bolts from the machine;
- connect the device to the house communications;
- align the machine body;
- run a test cycle.
Be sure to read the instructions for your Weissgauff washing machine—the user manual describes all the details of installing and commissioning the machine.
The washing machine instructions contain all the details:
- installation site requirements;
- options for connecting the machine to utilities, etc.
The user manual also provides a step-by-step guide to the entire installation process. Pictures are included for clarity, making it difficult to make mistakes. The washing machine's instructions also contain tips and recommendations.
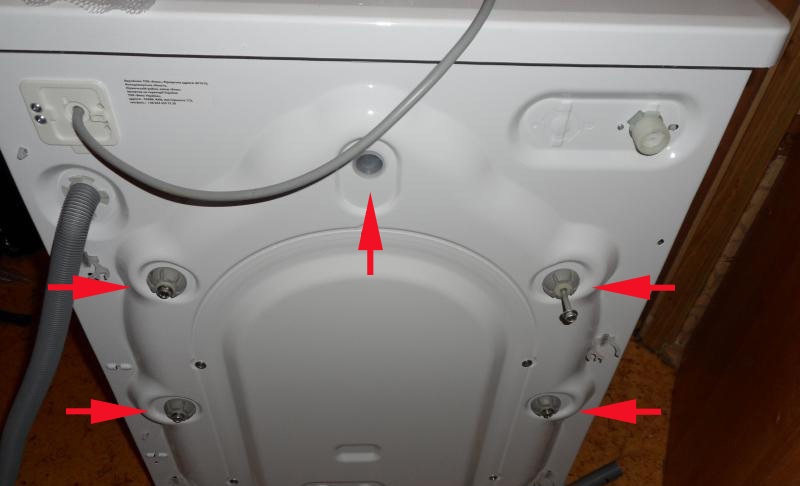
After letting the machine settle, you're ready to begin. Remove the protective stickers and inspect the drum—it's often where the washing machine components are stored. It's important to remember to remove the transport bolts from the washing machine.
The fasteners secure the tank in one position so that it does not wobble or hit other parts during transportation of the machine. Do not operate the washing machine without the transport bolts removed, as this may result in complete failure of the appliance. To remove the screws, you need to remove the back panel of the housing. The resulting holes are covered with special plugs, which are included with the Weissgauff washing machine.
If you run the machine with the shipping bolts still in place, you won't be covered under warranty. The breakdown will be the user's fault, meaning you'll have to pay for the problem yourself.
It's also important to decide where the machine will be located. What are the requirements for the location?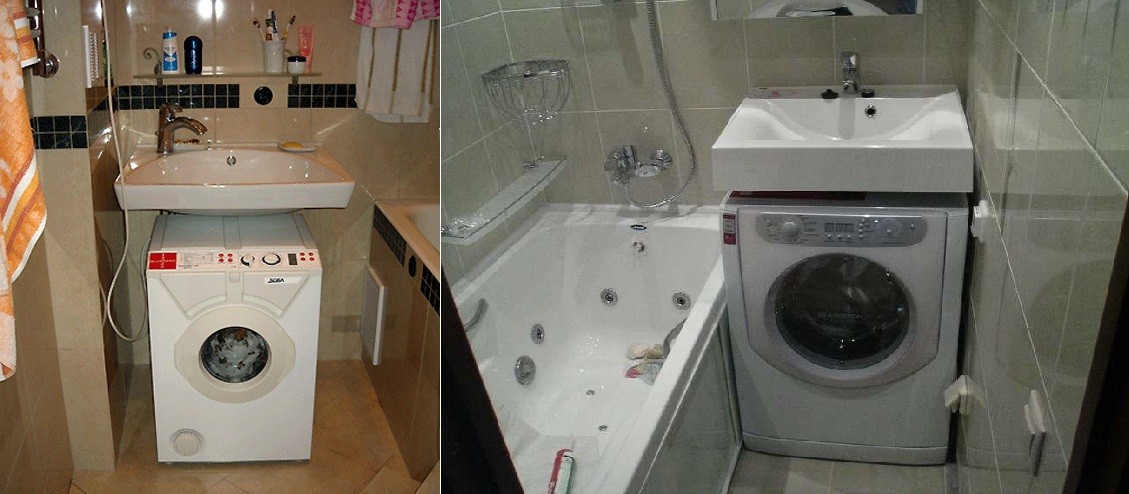
- close proximity to house utilities (it is forbidden to connect the machine via an extension cord or extend the drain and inlet hoses);
- a strong, level and hard floor covering (ideally, tiles or concrete; wood will need to be additionally reinforced).
If you're planning to buy a built-in washing machine, carefully measure the dimensions of the niche or cabinet. It's important to ensure the dimensions of your "home helper" are correct. Keep in mind that you need to leave at least 7-8 mm of clearance on the sides and at least 5 cm at the back, as this is where the hoses will be located.
Machine power supply
It's important to think about the washing machine's power supply in advance. It's best to install a separate power outlet for the washing machine. The optimal distance from the power point is one and a half meters, which is the standard length of the power cord.
You cannot connect the washing machine to the power supply via an extension cord.
All Weissgauff washing machines are equipped with 1.5-meter power cords. Therefore, the washing machine should not be placed any further than this. The cord must be connected directly to the power outlet.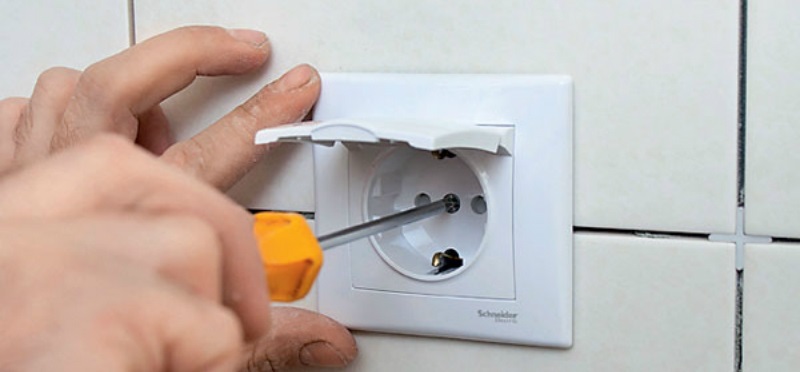
The outlet must be grounded. This will protect household members from electric shock and the room itself from fire. Otherwise, the machine's body will be subject to electrical shock, causing discomfort.
If the washing machine is installed in the bathroom, the outlet should have a special moisture-proof cover. It's best to connect the washing machine through a voltage stabilizer. This device will protect the washing machine from power surges.
We provide the machine with water
The new washing machine must be connected to a water supply. The inlet hose of the machine is connected to the cold water supply. The instructions for making the connection correctly are detailed in the instructions.
Some Weissgauff models can be connected to a hot water supply, but this is impractical. These machines are equipped with a powerful heating element to heat the liquid.
Connecting a washing machine to hot water poses the following risks:
- faster clogging of the filter elements (since hot water is dirtier, more scale and plaque will settle on the “insides” of the machine);
- poor washing quality (hot water is harder than cold water, so items will wash and rinse worse).
The instructions indicate whether the washing machine can be connected to a hot water supply. If this option isn't provided, don't bother trying. Simply connect the inlet hose to cold water—it'll be even better for your appliance.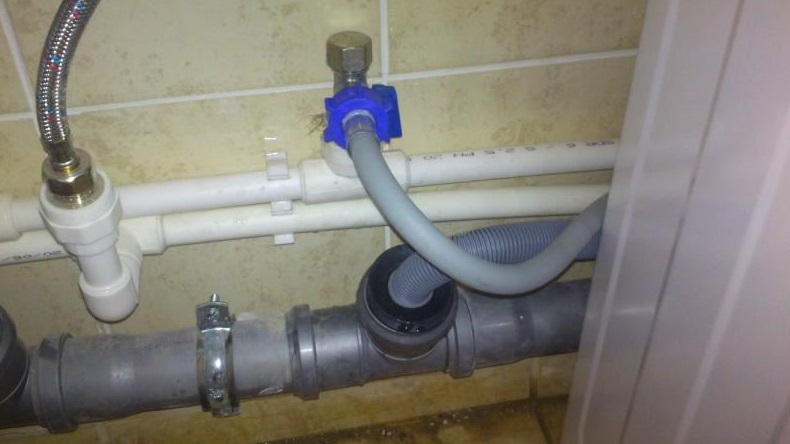
If you previously had an automatic washing machine, connecting the new one will be easy. Simply screw the inlet hose onto the existing outlet. Then open the shutoff valve and ensure there are no leaks at the connection.
If this is the first time an automatic washing machine has been installed in an apartment, a special tee will need to be installed in the pipe. The washing machine's inlet hose is connected to the outlet. The joint is then wrapped with plumbing string.
We organize the discharge of waste water
The next step is to organize the drainage. The easiest way is to lower the drain hose of the automatic washing machine into the bathtub or toilet. However, this option is only considered temporary. It looks unsightly, and the plumbing fixtures get dirty faster as dirty water, along with lint and threads, flows down them. Another drawback is the risk of the corrugated pipe coming loose and flooding the room.
Generally, the machine's drain hose is connected either to a trap under the bathtub or sink, or directly to the sewer pipe. Both options are acceptable. The connection must be secured with a clamp to prevent leaks.
It is important to position the washing machine drain hose at a certain bend, and arrange the connection point to the sewer at a distance of 50-60 cm from the floor.
Why is this bend and minimal height necessary? To prevent water from draining out of the washing machine by gravity. This drain hose placement also creates a water trap, preventing unpleasant odors and sewage from entering the machine's drum.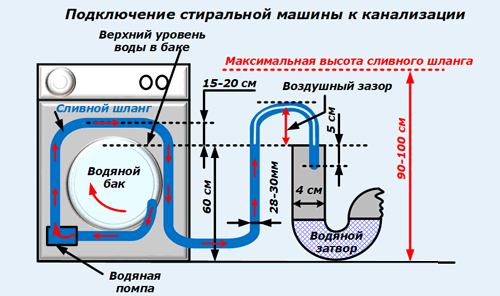
Once the water supply and drainage are established, you can move the automatic machine back into place. Be sure to level the washing machine body; you can adjust its position using the adjustable feet. It is recommended to place a special rubber mat under the washing machine to absorb vibrations.
Now you can turn on the machine. The first time you run a new washing machine, it should be empty, with no laundry in the drum, but with detergent. During the test cycle, the machine will be cleaned from the inside, removing factory dirt and accumulated debris.
During the test cycle, observe the machine. Make sure it fills with water, spins the drum, and drains. If you notice any problems or a leak, pause the wash cycle. If everything runs smoothly, consider your Weissgauff washing machine ready for use.
Interesting:


Readers' comments
Headings
Washing machine repair


For buyers


For users


Dishwasher


Add a comment