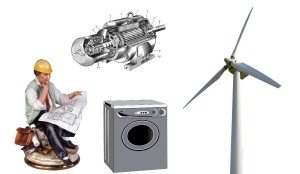
Wind generator from a washing machine motor
 Many people are interested in alternative energy sources these days, but they rarely move beyond speculation and ideas, as they are incredibly expensive. For example, a 2.5 kW wind generator, including a gearbox and propeller, will cost around $60,000, not including the installation fee—a bit steep, to say the least. But you don't have to give up on the idea because you lack money. You can build your own wind generator from washing machine parts, and we'll share our experience making it with you.
Should I start making a wind turbine?
The answer to the question of whether a wind turbine is needed is up to each individual. But if the question is pressing and you're simply debating whether to buy one or build one, we'll give you some concrete figures. A Chinese-made wind turbine, complete with all the bells and whistles and installation (called a turnkey project), will cost you $750, and that's at pre-crisis prices. A DIY wind generator made from a washing machine will cost an average of $35. (maybe a little more expensive if scrap metal is tight). As they say, feel the difference.
Of course, it's not just about the money. Perfecting a homemade wind generator requires a fair amount of time, ingenuity, and a knack for craftsmanship. But overall, the results are worth it, as you'll end up with a stable 2.5 kW device. This is enough to power a small summer house, at a minimum. Specifically, our wind turbine provides lighting for two rooms of the summer house, a computer, and a small portable TV.
Please note! To maximize the efficiency of your wind turbine, it's important to consider its installation location right away. An open space is ideal.
Selecting the necessary spare parts
As mentioned above, if you have a garage full of various metal scraps, the cost of making a wind generator from a washing machine motor is significantly reduced. The main component you need to figure out first is the generator. The generator unit is the basis of your homemade wind turbine, but it is also its most expensive element.
Some DIYers suggest making a generator out of a washing machine motor. This makes sense, but it also comes with a problem. The motor would have to be redesigned, specifically, equipped with a magnetic rotor. There are two options: one is to buy a magnetic rotor, the other is to make one. We suggest skipping the hassle and ordering a ready-made rotor. Why?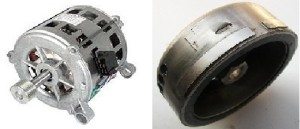
- A homemade rotor will require special neodymium magnets, which will have to be ordered anyway. A set of these magnets is priced the same as a new magnetic rotor made in China.
- Assembling a homemade magnetic rotor comes with its own challenges. You'll need to cut out a special shape and glue each magnet securely—a thankless and painstaking task.
- The magnets on the rotor need to be positioned at the correct angle, otherwise they will stick and the generator will stop working. Calculating this angle is difficult, and securing the magnets in this position is also difficult.
Please note! The magnetic rotor for the future generator is the main cost; shipping will cost approximately $2–$2.50.
A 2.5W store-bought rotor fits perfectly with a modern washing machine motor; no modifications are even required. Incidentally, a washing machine motor can be used to make not only a wind turbine, but also, for example, grain crusher, but that's another story. Next, you need a mast, gearbox, long shaft, gears, and impeller. We admit that depending on the availability of certain materials, technical solutions may vary. In our case, the mast was made like this:
- Several sections of used 32mm steel pipes were taken and connected together to form a single hollow structure 10m long.
- Next, the mast was painted white.
- After this, the mast was ready to be raised onto the pole. We attached protruding steel brackets made from angle iron with a hole to the pole to ensure the mast was securely held vertically while allowing for unimpeded rotation.
If there's no non-functional pole nearby, we'll need to solve the problem of supporting the mast, as the pipe structure itself is unstable. Next, we'll assemble a gearbox for a vertical-axis wind turbine, as shown in the figure below.
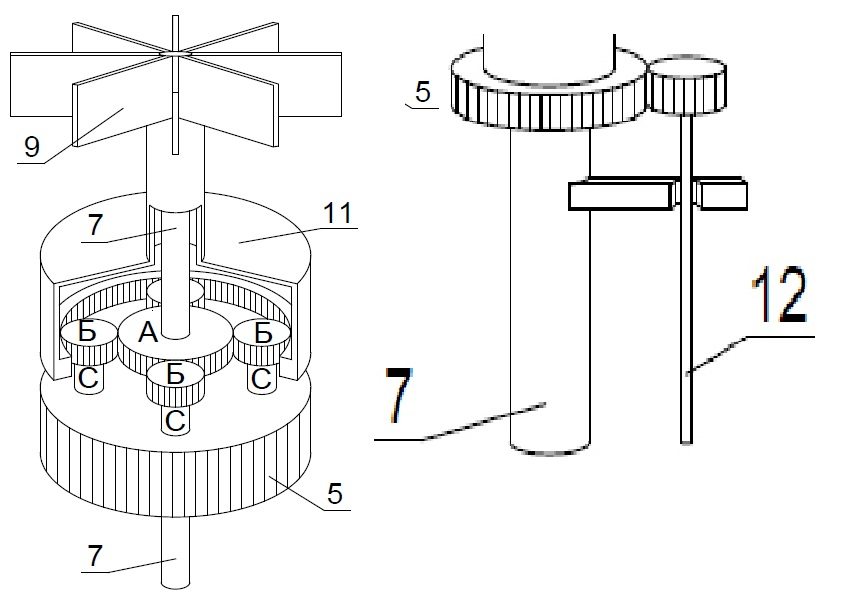
- The main gear (5), mounted on the mast, was taken from the water pump drive.
- Turned pieces of reinforcement are welded to the gears in a circle, they are also axes (C) - 4 pcs.
- Bearings with gears (B) are pressed onto the axle.
- The small gear (A) from the same water pump, mounted on the mast, comes into contact with the gears (B), while at the same time the edges of the gear (B) interact with the teeth of the gearbox housing.
The peculiarity of this gearbox design is that its body rotates around the mast completely freely together with the propeller. This slows the propeller rotation speed slightly, which impacts the wind turbine's efficiency, but the structure becomes more stable and durable. Even in hurricane-force winds, the wind turbine will not fail thanks to the gearbox that controls the propeller speed.
The gearbox housing (11) can be a stumbling block; what to make it from? The specific bottle-shaped housing with circular teeth must be of the appropriate dimensions. We solved the problem by adapting a steel housing from an electric motor from an industrial pump; we didn't even have to cut any threads. The gearbox internals were already designed to fit its dimensions. You can do the same or make your own housing to your specifications.
Important! Manufacturing a gearbox housing will require the help of a specialist, so to save money, try using ready-made housings from used motors and pumps.
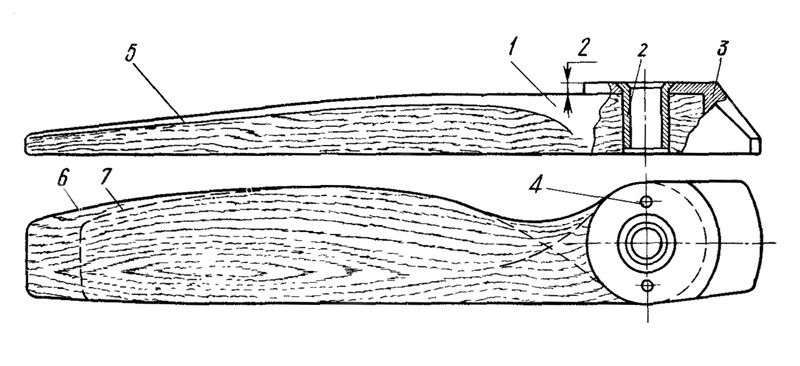
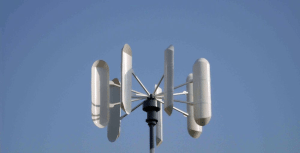
Another difficulty is making the impeller. By the way The impeller will not be positioned perpendicular to the earth's surface like most industrial wind turbines, but horizontally, as this makes the design simpler and more reliable. This eliminates the need for a device to guide the impeller downwind. This is clear, and it's also clear that the impeller must be firmly attached to the rotor housing, but how and from what to make it? This was quite an epic endeavor for us.
- We first made the impeller blades from five-ply plywood. This material might have worked if the blades had been shorter. However, since our design calls for blades at least 1.5 meters long, and preferably 2 meters, the plywood propeller broke in wind gusts of 10-15 m/s.
- To solve the problem of making a lightweight and durable propeller, we used scraps of fiberglass sheeting given to us by friends. It's a very strong yet flexible material. To ensure the rigidity of the structure, we had to cut six rectangular strips instead of three and glue them together. Only then did we join the strips into an impeller, each 1.6 m long. The impeller turned out to be extremely durable; it even survived a storm with wind speeds of 37 m/s.
- While we were making the fiberglass propeller, I came up with the idea of making a different (orthogonal) propeller, as shown in the picture below. The base of the structure, made of lightweight duralumin angle, is topped with large oval blades made of painted sheet metal. Unfortunately, we weren't able to implement this idea due to time constraints, but perhaps you'd like to create something similar.
Next we will need a small gear and a shaft (12) onto which it is pressed. We will fix the shaft in special fasteners so that it does not jump out, but at the same time rotates freely. The last thing we'll need is a flange to connect the rotating shaft to the generator. We'll make the shaft from welded reinforcing bars.
Some might ask, "Why bother with all this complexity? A rotor with a bunch of gears and cogs?" In fact, it's entirely justified, as wind loads are highly uneven across much of Russia. Wind frequently changes direction and speed, which negatively impacts the mechanism of a standard wind turbine, which would break down frequently, which is unacceptable. The wind turbine mechanism we've proposed, made from a washing machine motor, is much more robust and, if well-made, will last a long time.
Let's build a wind turbine ourselves
 The design concept has been defined, the parts have been selected, and a drawing based on them has been created. Now we can begin assembling the wind turbine from a washing machine motor. First, we determine the location of the wind turbine. The pole should be placed in an open, windy area, preferably on a hill. The pole should be as high as possible; in our case (as we mentioned earlier), we used a 10-meter-tall wooden utility pole, disconnected from the power grid, located on our property. Next, we proceed as follows.
- We installed the mast on the support using special fasteners. We used mounting claws for installation.
- We install the previously assembled gearbox with impeller on the mast and make sure it is working properly.
- We connect the shaft to the main gear (5), located on the mast at the base of the gearbox.
- We fix the shaft in the special fastening elements described above.
- We connect the rotating shaft to the generator, which must first be secured to a steel support welded from angles vertically directly opposite the shaft. The support can be made of any kind, as long as it securely holds the generator.
- To protect the generator from rain and snow, you can build something like a shed or sturdy shed over it. This will help it last much longer.
So, we've outlined the process of creating a wind generator from a washing machine motor. Now you can begin testing it. We hope it will help you take another step toward autonomous power for your cottage or private home.
Interesting:


Readers' comments
Headings
Washing machine repair


For buyers


For users


Dishwasher


Add a comment