How to turn on a Vyatka washing machine?
 Turning on a Vyatka-automatic washing machine immediately after purchase is a bad idea. Before starting the machine, you should read the instructions and prepare it for washing by following several important steps. Otherwise, the machine will either wash poorly or break down. To ensure the first start-up goes smoothly and without any surprises, follow a specific sequence. We'll explain what and how to do in detail.
Is the equipment ready for operation?
Before you start washing, it’s worth delving into the theory and studying the user manual. The instructions supplied with the machine must include the operating instructions for the washing machine, as well as the specifics of its installation and connection to the electrical network. The documentation also provides a description of the dashboard icons and a description of the main and additional programs and functions. Next, you need to prepare the machine for washing. This includes the following steps:
- let the machine “stand” for 2-3 hours at room temperature (especially if the equipment was transported during the cold season);
- adjust the position of the washing machine body;
- connect and install communications;
- remove the transport bolts;
- clean the drum;
- remove factory stickers.
Let's look at each point separately. It's best not to connect a newly purchased vending machine to the power supply after transportation. All components need to acclimate to the new environment, especially if transported in low temperatures. Rubber components, the motor, and wiring need to warm up and restore their operating characteristics.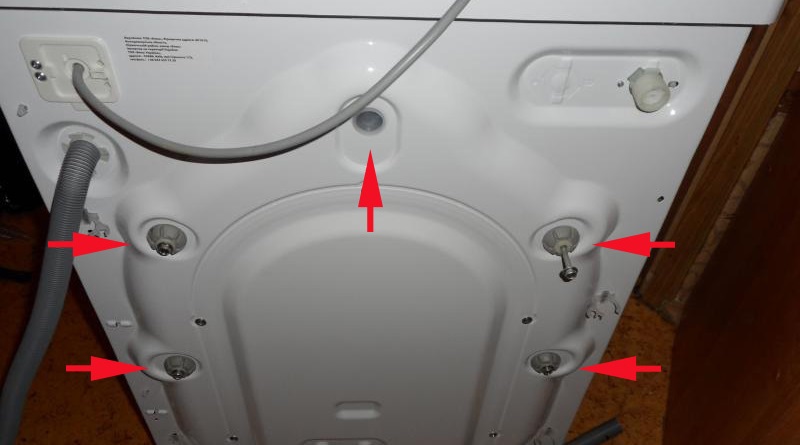
The second step is installing the machine. Ideally, have a professional install the washing machine: it's important to properly adjust the machine's position, level the body, and tighten the hose clamps. Otherwise, the machine will bounce around the room and risk leaking.
The next step is to remove the transport bolts. These are the extended bolts that secure the washing machine drum during transport. This protects the drum from loosening and damage. However, do not operate the washing machine without removing them: attempting to spin the drum while it's still in place will damage the cylinder, bearing assembly, shock absorbers, and the motor itself.
Washing without removing the transport bolts is not considered a warranty case - the consumer will pay for the repair out of pocket.
Removing the shipping bolts is easy:
- the number and location of bolts on a specific Vyatka model is specified;
- the fasteners are loosened;
- the rods are pushed inward until they stop;
- The holes that appear are closed with the plugs included in the kit.
Be sure to inspect the washing machine for cleanliness. Remove all factory stickers and tape from the body. Also, remove any plastic ties and the foam frame. Pay special attention to the drum, as it often contains additional components. After cleaning, wipe the machine with a dry cloth.
Now the washing machine is ready to use. But it's too early to load the drum—it needs to be run through an empty cycle first. How to do this correctly is described below.
Test run
After reviewing the instructions and preparing the machine, we proceed to the technical start-up. This refers to a "blank" cycle—washing without laundry. This accomplishes three tasks at once:
- factory grease and dirt are washed away;
- the “chemical” smell typical of new equipment is eliminated;
- The washing machine is checked for proper operation (whether the unit is working, whether the pump is pumping out water, how the machine makes noise and vibrates).
The first wash must be carried out without any laundry. Otherwise, the rinsed technical lubricant will remain on the fabric, ruining the items. Worse yet, due to a manufacturing defect, you'll have to stop the cycle and return the appliance, leaving behind the wet and dirty items.
First, Vyatka is started without laundry, but with detergent.
Detergent is a must-have to thoroughly clean the appliance's internal components. Add regular powder or a special cleaner to the drum or dispenser. The machine starts up in the standard way: insert the plug into the socket, turn on the water supply and press the “Start” button. If the Vyatka model does not have a start key, then turn the selector to the desired position.
When you first start the machine, don't go too far from it—it's essential to monitor its operation. If you notice increased vibration, leaks, or a suspicious hum, the machine has a manufacturing defect. Forcefully stop the cycle and contact a service center.
We set up and start the machine
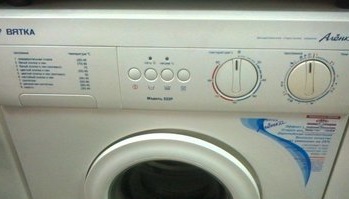
For the maintenance cycle, any high-temperature setting—Cotton or 60—is suitable. For subsequent washes, the program is selected more carefully, taking into account the type and color of the fabric. Choosing the right option is easy, as modern models offer dozens of modes and functions.
The purpose of most programs is easy to guess, based on the standard symbols found on all washing machines. However, it's best to re-read the manual and familiarize yourself with the features offered on your model. It lists all the modes and options, along with their efficiency, duration, temperature, and spin speed. Once you've chosen the program, you can begin washing. Here's how: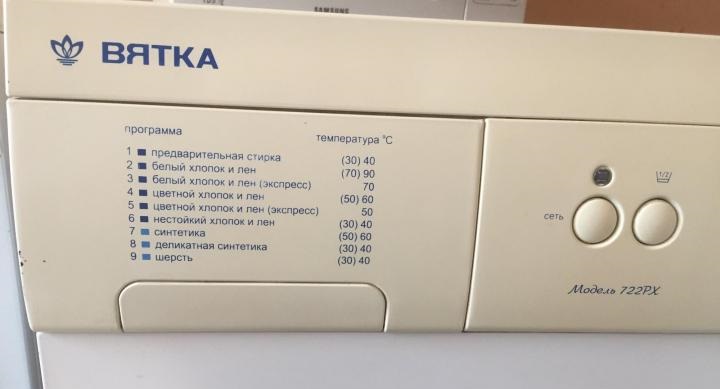
- insert the plug into the socket;
- turn on the water supply;
- we load clothes into the drum (remembering to sort the laundry and load standards);
- close the hatch door tightly (the lock should click);
- add detergent to the dispenser;
- turn the selector to the selected program;
- If necessary, manually change the standard program settings;
- we start the cycle.
That's it! The Vyatka washing machine will signal the end of the program with a beep. However, for safety reasons, the electronic lock on the door will only be released after 2-3 minutes. After that, you can open the drum and remove your clean clothes.
Where to pour the powder?
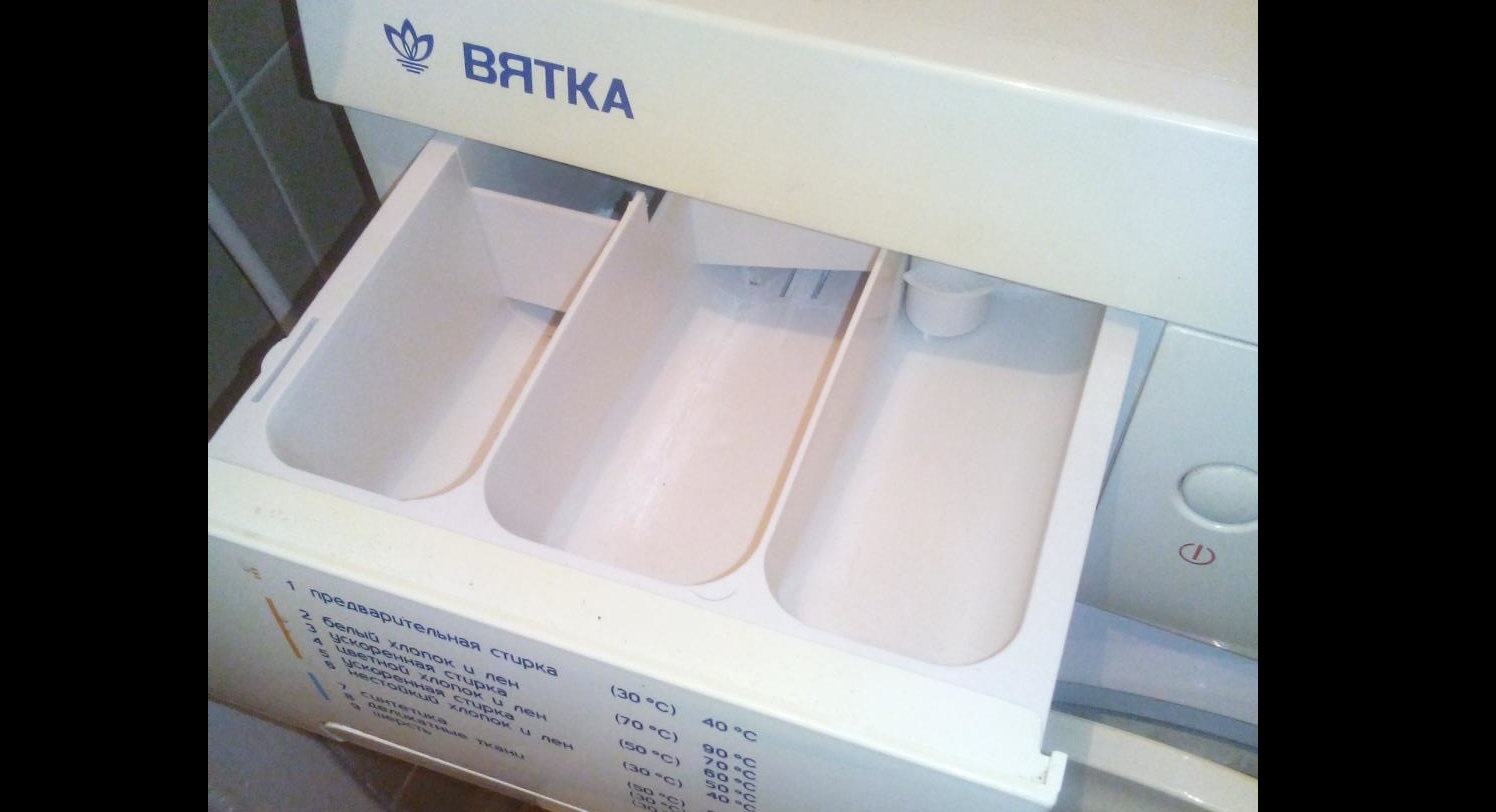
In the upper left corner of the Vyatka washing machine there is a dispenser – a powder receptacle through which detergent is added to the machine. Thanks to the special design of the tray, the powder is not washed out of it immediately, but is fed into the drum in a measured dose, which ensures high-quality washing. It's easy to use: just grab the handle, pull it towards you, and pour the concentrate into one of the compartments.
When adding detergent, please keep the following rules in mind:
- For automatic washing machines, only powders and gels marked “automatic” are used;
- Preference is given to high-quality and proven products on a natural basis, without phosphates and aggressive bleaches;
- Delicate fabrics are washed with special gels that dissolve completely in cold water;
- the products must be dosed using measuring cups, caps and spoons;
- It is advisable to have separate powders for white, colored and black laundry at home;
- Remember the purpose of each compartment of the dispenser (compartment “I” is where powder is added for the pre-wash program, “II” is where it is added for the main wash, and “*” is where additional liquid detergents, conditioner, softener, and bleach are poured).
When adding powder, remember the dosage!
Vyatka washing machines can also be equipped with modern cleaning products, such as cleaning wipes and gel capsules. They are more expensive, but safer and more effective due to their advanced, concentrated formula, targeted action, and convenient design. These products are placed directly into the drum.
Interesting:


Readers' comments
Headings
Washing machine repair


For buyers


For users


Dishwasher


Add a comment