Dismantling a built-in washing machine
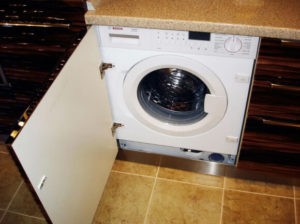 Sooner or later, you'll need to remove your built-in washing machine from your cabinet. Whether it's a renovation, a move, or simply a desire to upgrade to a more modern appliance, the machine still needs to be removed from the cabinet. This simple task becomes difficult in practice, as the unit is firmly fixed in its niche, seemingly impenetrable. Removing a built-in washing machine without damaging the cabinetry or the machine itself can be quite challenging. To do this quickly, carefully, and correctly, it's essential to strictly follow the instructions.
The procedure for removing the machine
It's not recommended to rush the removal of a built-in washing machine. It's necessary to proceed in a specific sequence, preparing and disconnecting the appliance from its utilities. Ideally, you should call an assistant - the machine weighs 50-80 kg and is pulled out in a very awkward position. To avoid dropping the unit, it's best to have extra hands on the job. Before removing the equipment, complete the following procedures:
- disconnect the built-in circuit breaker from the power supply;
- secure the power cord to the washing machine body so that it does not interfere during dismantling;
- turn off the water by turning the pressure tap;
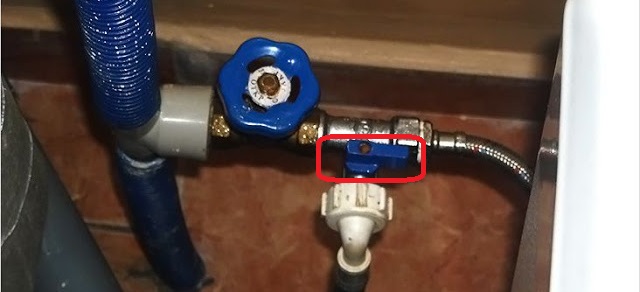
- unscrew the inlet hose from the water pipe, drain the water from it and attach it to the body;
- disconnect the drainage hose from the siphon or sewer riser (be sure to drain the water and secure it to the machine);
- remove additional fasteners (sometimes workers screw on holders when installing equipment to make the machine more stable);
- get rid of the front protrusion of the niche (without it, it is much easier to get the machine gun out);
- screw the washing machine's feet to the minimum height.
Before dismantling the built-in washing machine, it is necessary to disconnect it from the utilities and unscrew the additional fasteners.
Once the appliance is ready, you can begin disassembling it. Open the washing machine door and grasp the front panel at the top of the hatch. Then, lift the machine while simultaneously sliding it toward you. If anything is blocking it, do not use force. Instead, inspect the machine again to determine what it is clinging to. This will ensure the machine leaves the recess without damage or surprises.
To make the machine's slide easier, it's recommended to place an old sheet of cloth under the machine's feet. This will also protect the flooring—otherwise, heavy equipment could scratch linoleum or tile.
Preparing the machine for transportation
Rarely does a dismantled washing machine go straight to the landfill. More often, it requires further transportation to a summer cottage, a service center for repairs, or to a new owner after sale. In any case, the machine must be prepared for moving. Otherwise, you could damage key components of the washing machine during machine shaking. First, you should:
- drain all the water from the machine through the waste filter (there is always some liquid left at the bottom of the tank and in the pipes, which must be removed before transportation);
- fix the hoses to the body (the manufacturer has provided special grooves and clamps);
- close the hatch door (so that the hinges do not loosen);
- seal the powder receptacle with tape (otherwise it will fall out of the housing and get in the way);
- wrap all protrusions and corners with paper or cloth (ideally, you should use a foam frame).
Before transporting the washing machine, it is recommended to screw the transport bolts through the special holes on the rear panel of the housing - they will secure the tank and protect the shock absorbers.
The next step is to secure the drum in place. It's best to screw in the shipping bolts included with every washing machine and removed before using it for the first time. If the rods are missing, you'll have to secure the drum with a less secure and labor-intensive method: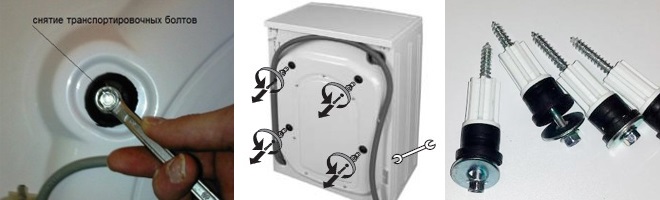
- remove the top cover of the housing by unscrewing the retaining bolts;
- fill the empty space between the tank and the body with soft material (foam, foam rubber, textile);
- put the lid back in place.
At the "finishing" stage, the washing machine is completely wrapped in cloth and tied with rope. Now the machine is ready for transport.
Proper transportation of a car
Once prepared for transportation, the washing machine can be carried and loaded into a vehicle. However, there are several nuances that must be observed to ensure the machine's proper operation. The first is to lower the machine down the stairs correctly: despite its weight and size, it must not be turned over. A slight tilt backward is permissible, but it is best to keep the machine strictly upright.
The second point concerns the transportation itself. Manufacturers allow washing machines to be transported in three positions:
- standard, standing;
- on one of the side walls;
- on the back panel.
The transportation method chosen depends on the vehicle's specifications. If you're using a truck, it's best to park the washing machine upright. In a compact car, you'll have to place the washing machine on its side or back.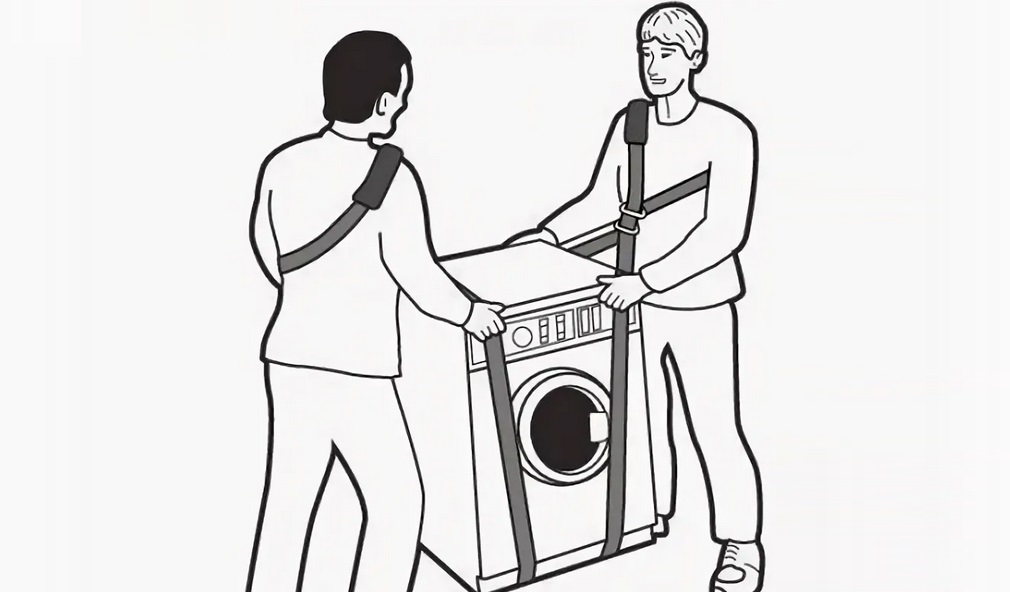
Experts recommend placing the washing machine upright and facing the direction of travel. The key is to secure the drum with shipping bolts or pad it with foam. If other equipment or furniture is being transported in the truck bed, it is recommended to “clamp” the machine between heavy objects on two or more sides. Then the unit will be fixed as much as possible, and the dampers, contacts and hoses will not be damaged by possible machine shaking.
It is prohibited to turn the washing machine upside down during transportation – this is unsafe for the motor and the drum.
Placing the washing machine on its top is strictly not recommended. Firstly, the shock absorbers will not be able to absorb the vibrations during transport. Secondly, the motor will be damaged by overload. Turning the machine over is only permitted after completely draining the water and removing the motor.
When transporting a washing machine on its side, be mindful of the detergent dispenser. It always contains water, which can leak out when the machine is turned, splash onto the control board, and damage the contacts. To avoid damaging the electronics, wipe the dispenser dry first or remove it from the housing.
Most washing machines can be safely transported on the back wall. Zanussi models are the only exception. This is because the inlet valve on these machines is located near the counterweights. When the machine is placed on the back wall, the blocks collide with the valve mechanism, which breaks under the weight of the concrete. Placing a washing machine on the front wall is strictly prohibited. The flimsy door hinges and seal will not support the weight and will crack and tear. The door glass is also at risk of breaking.
Interesting:


Readers' comments
Headings
Washing machine repair


For buyers


For users


Dishwasher


Add a comment