How to remove the filter on an LG washing machine
 At first glance, removing the drain filter from an LG washing machine seems simple and straightforward—unscrew it, clean it, and replace it. But sometimes a split-second task stretches into hours, leaving your apartment in danger of flooding, and the machine itself without a drain pump. To avoid risking your nerves and property, it's best to follow the instructions carefully.
Removing a part under normal conditions
There is definitely no need to rush to remove the filter. If you get down to business right away, water will flow through the hole that is released onto the floor. And whether the drum is empty or full, dirty waste liquid always remains in the washing machine's drum, which, without a stopper, quickly flows out. The consequences of such haste depend on the surrounding environment: you could end up with a dirty rug, damaged flooring, or even a local flood. Either way, it will require time and effort.
This doesn't mean you should forget about cleaning the filter. You just need to approach the procedure wisely and with proper preparation. For example, before removing a part from your LG, it's recommended to perform a few simple steps.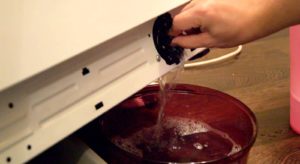
- Disconnect the machine from the electricity.
- Remove carpets, extension cords, boxed detergents, and other items that should not be exposed to moisture from the machine.
- Protect vulnerable flooring from water damage. The most reliable method is to line the area under and around the unit with plastic or plastic sheeting and layer old rags on top.
- Prepare rags and flat containers to collect the leaking water. Plastic containers and frying pans work well.
- Tilt the washing machine body back until the front legs are 3-5 cm off the floor, and place the prepared container in the space under the filter compartment.
- “Insure” the container by placing rags around it.
Trying to remove the debris filter immediately after the cycle ends can cause burns from the hot water jet. It's best to wait a few hours until the water has cooled completely.
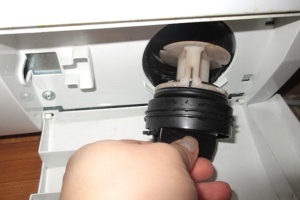
Once the steps are completed, let's get to work. First, open the service hatch and locate the filter cover. Grasp the protruding "handle" and turn it half a turn counterclockwise. Pull it toward you, applying some force. As soon as the nozzle releases, water will flow out of the hole. Be prepared for an uneven stream—the plastic cover will splash liquid, so placing rags around it will be helpful.
What if you can't unscrew it?
But unscrewing the spare part does not always go smoothly. Sometimes attempts to remove the filter do not produce the desired result, as the coil is stuck to the housing or the threads are clogged. In the first case, a white or yellow residue is visible from under the rubber gasket, while in the second, it feels like the "trash can" is holding something in place. In these situations, the standard approach won't work—you'll have to take a different approach. So, if the filter won't come off, you need to:
- prepare pliers or round-nose pliers;
- “grab” the filter “handle” with the tool;
- carefully turn the part.
Don't press too hard, otherwise the fragile plastic will break, and the desired effect won't be achieved. If this still doesn't work, change tactics: tilt the washing machine back about 15-20 cm from the floor, leaning the body against the wall. Return to the filter and try to dislodge it with your fist several times. A strong push can dislodge the foreign bodies holding the nozzle and free the threads.
Trying to pry the debris filter out of its seat with a screwdriver is not recommended. There's a high risk of damaging the filter element and complicating the repair with a new problem.
If the fist method doesn't work, you'll have to take the difficult but most effective route: cleaning the waste filter from the pump side. Access the volute through the bottom of the machine, remove the clamps from the adjacent pipes, loosen the fasteners, and remove the drain pump. For ease of access, you can also unscrew the front panel of the housing. Next, soak the removed parts in hot water, and the cleaned filter can be easily unscrewed.
Removing the filter on an LG washing machine is easy if you prepare wisely, take your time, and remember safety precautions. Regularity is also important—leaving it sitting for too long will clog the threads and complicate the task.
Interesting:


Readers' comments
Headings
Washing machine repair


For buyers


For users


Dishwasher


Add a comment