How to replace the tank in an Ariston washing machine yourself?
In some cases of malfunction, replacing the drum in an Ariston washing machine is unavoidable. This is a labor-intensive task, requiring the removal of the old drum and installation of a new one, which requires almost complete disassembly of the machine. To replace the drum, you need to prepare your tools, work area, and the washing machine itself. A step-by-step guide will help you avoid mistakes.
What will you need?
Once the problem has been diagnosed and a new container has been purchased, you can begin working. The first thing you need to do is prepare for the upcoming replacement - collect the required tools. Let us remind you that to remove the drum you will have to completely disassemble the washing machine, which cannot be done without:
pliers;
screwdrivers (flat and Phillips);
adjustable wrench or set of wrenches.
This is the bare minimum. It's possible that other defects will be discovered during disassembly, requiring additional tools to fix them. It's best to be on the safe side and bring all available tools to the work site.
Before any repairs, the washing machine must be de-energized and disconnected from the water supply!
Pay special attention to your work area. To make changing the drum yourself more convenient and easier, move the washing machine to a spacious room, garage, workshop, or hallway. It's recommended to line the area around the machine with rags, plastic sheeting, or old newspapers.
We remove the main unit of the machine
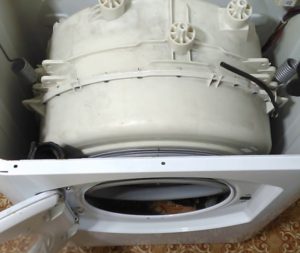
Removing the drum from an Ariston washing machine isn't easy. You'll need to disassemble the machine almost completely. Here's how:
we disconnect the machine from communications, electricity, sewerage and water supply;
unscrew the bolts holding the top cover and remove the panel;
we press the central valve on the dispenser and remove the powder receptacle;
we unscrew the screws that secure the instrument panel;
we disconnect the instrument panel from the body and, without disconnecting the wires, place it on top of the washing machine;
It is recommended to record all actions on camera to facilitate reassembly.
Using a flat-head screwdriver, bend back the plastic latches on the service hatch and remove it;
unscrew the debris filter and tilt the machine forward to drain the remaining water in the hoses;
We use a screwdriver to hook the outer clamp on the cuff, loosen the ring and remove it;
we tuck the cuff inside the drum;
we disconnect the wiring from the hatch locking device by unscrewing the screws and releasing the hatch locking device sensor;
we unscrew the bolts located around the perimeter of the front panel of the washing machine;
we pull the end freed from the bolts towards ourselves, remove it and put it aside;
we remove all fasteners and elements from the surface of the tank (pressure switch, drain hose, filler pipe of the inlet valve);
disconnect the wiring coming from the heating element;
we take out the heater, electric motor, thermostat and drain pump;
we remove counterweights, shock absorbers and spring elements from the housing;
We make sure that the tank is free of tubes and wires.
Ariston washing machines have non-separable plastic tanks and metal drums.
Now you can remove the tank. Removing the reservoir is difficult, so it's highly recommended to work in pairs. One person grasps the drum, lifting the tank, while the other unhooks the upper springs. There's no need to worry about the tank's weight - only lightweight plastic tanks are installed on the Ariston.
Installing a new part
Once the old tank is removed, you can begin installing the new one. First, you need to find a replacement part. Ideally, order the original part from the manufacturer. It's important to understand that there's no point in cutting the tank in half and extracting the "whole" drum—Ariston supplies the parts as a single unit. Buying a plastic "half" from local dealers is unsafe, as counterfeits are common, leading to leaks and breakdowns.
After purchasing, we recommend checking the tank for leaks. Simply plug all the designated outlets and fill the drum with water. This quick test will immediately identify any defective components and save time on installation.
If the new tank doesn't leak, you can begin assembly. Follow the previously described procedure, only in reverse order. Start with the springs and shock absorbers, then add the counterweights and replace all the previously removed wires and hoses. Next, install the main components, screw on the front panel, attach the locking lock, and insert the powder receptacle and pressure switch.
After installation, run a test wash and evaluate the results. If there are no suspicious knocking sounds or water drips, the replacement was successful.
 In some cases of malfunction, replacing the drum in an Ariston washing machine is unavoidable. This is a labor-intensive task, requiring the removal of the old drum and installation of a new one, which requires almost complete disassembly of the machine. To replace the drum, you need to prepare your tools, work area, and the washing machine itself. A step-by-step guide will help you avoid mistakes.
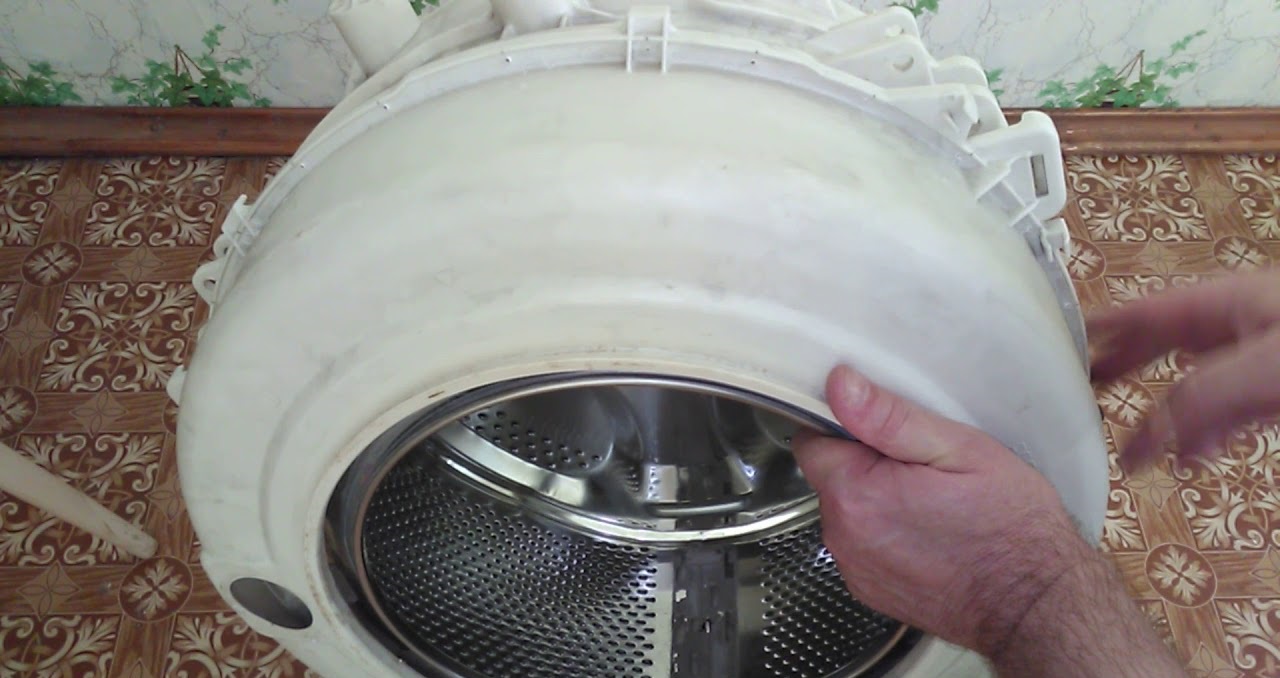


Add a comment