Replacing the spider in an LG washing machine
 The spider in a washing machine is a soft metal component that attaches the drum to the tub. This component is subject to constant stress, causing it to become deformed or break, necessitating repair. Replacing the spider on an LG washing machine is impossible without removing it, so let's take a closer look at this issue.
Reasons for failure
In reality, the impact on the universal joint doesn't begin immediately; the bearings are the first to bear the brunt. Over time, they too wear out, starting to make an uncharacteristic humming and grinding noise during washing. If bearing problems are detected and corrected in time, the universal joint will remain intact and no repairs will be required. However, if the situation is left untreated, a complete replacement will be necessary.
Another common cause is hard water. The compounds settle on the metal, forming scale and limescale. In some cases, a manufacturing defect may be the cause, but in this case, it's best to take the machine to a service center if it's under warranty.
Let's start disassembling the SM
Before starting work, unplug the washing machine from the power outlet and water supply. Then, disconnect the inlet hose (located at the back of the machine) and drain filter (located underneath the front panel of the machine, inside the hatch). For convenience, it's also a good idea to move the machine away from the wall and place it in a spacious area.
There are two ways to remove the part yourself: by unscrewing the top panel or the front panel. The latter method will be much more labor-intensive and painstaking, so it's best to remove both.
- Remove the screws holding the top panel of the washing machine. Then push the lid away from you and lift it up sharply. Now simply set it aside to keep it out of the way.
- Now you need to disconnect the control panel. First, open the detergent drawer and remove it by pressing the release button in the middle compartment of the dispenser. Now, through the resulting recess, unscrew all the screws holding the control panel in place. Release the plastic clips holding the wiring. Be sure to mark the wiring around the perimeter so you can reinstall everything correctly. Disconnect the wires and remove the panel.
- Turn to the bottom of the front wall. The baseboard panel is easy to remove, especially since you should have already done so when you removed the drain filter.
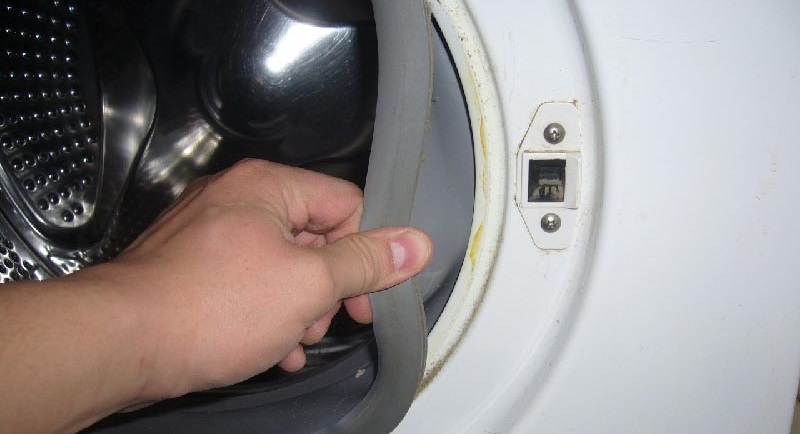
- Remove the sunroof rubber seal. To do this, bend its edges slightly to find the clamp. It can be either plastic, in which case simply unfastening the special clasp is enough, or solid metal, in which case pry it up with a screwdriver or other sharp object and pull it out. The seal can be removed without the clamp.
- Once the cuff is removed, all that's left is to remove the lock. To do this, unscrew the bolts holding the device in the recess. Push the lock through the opening previously covered by the cuff and remove it.
- The front panel is almost finished. To remove the main panel, all that's left is to unscrew all the bolts and screws.
Important! It's a good idea to remember which screws were used to hold the parts in place, otherwise confusion may arise later, and the device may not be able to be reassembled.
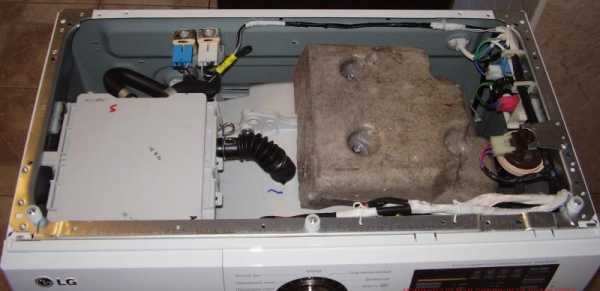
If you've already removed the powder dispenser, remove the hose connecting it to the tank as well. After that, you can easily remove the inlet valve (just remember to unscrew the bolts on the back). It is also advisable to remove the counterweights, as they are very heavy and will interfere with your ability to quickly operate the machine yourself. The counterweights are attached with large screws.
The last thing left to do is remove the back cover and whatever's underneath. It's simple: unscrew the bolts and remove the panel. Disconnect each part one at a time:
- wiring from the heating element;
- pressure switch tube from the tank;
- drain pipe clamp;
- wiring from the motor, then unscrew the screws and remove the motor itself;
- remove the shock absorbers.
Now there's nothing holding the tank in place; it simply hangs on special hooks. It's easily removed from the front of the SM by lifting it slightly and then pulling it toward you.
Tank and drum
The tank can be removed. First, remove the seal. Then, turn the tank so that the pulley faces you, unscrew the bolt holding it in place, and remove the pulley. Remove all screws around the perimeter. Once there are no bolts left, you can easily remove one half of the tank and access the drum.
Now move on to inspecting the universal joint itself. It's possible it doesn't need repair at all, and the problem lies in the bearings. Whatever the case, purchase a new part, specifically for the specific model of your washing machine.
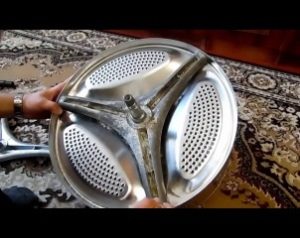
We are changing the crosspiece
 Now, let's take a closer look at how to replace the spider. It's attached to the drum with three screws. Due to scale and other hard water issues, the bolts can become firmly stuck, making them difficult to remove. WD-40 can help. Pour it onto the stubborn parts and wait about half an hour. The scale should dissolve, after which you can easily remove the screws.
Removing the universal joint is quite simple: take a hammer and screwdriver. Gently tap the part or pry it out of the drum grooves with a screwdriver. Now you can buy and install a new universal joint.
Interesting:


Readers' comments
Headings
Washing machine repair


For buyers


For users


Dishwasher


Add a comment