How to change the seal on a Samsung washing machine
 A defect in the rubber seal surrounding the washing machine's door can be easily detected. Since it's located in a visible place, a quick look can reveal cracks in its surface, heavy dirt, and other problems that can impair the washing machine's performance. Even minor damage to the seal will cause water to leak from the drum. Replacing the door seal isn't as difficult as it might seem. We'll explain how below.
Why do this?
Removing the sealing cuff may be necessary not only if external damage is detected. Often, it may appear intact, but no longer performs its intended function to the fullest. Experts recommend periodically replacing the gasket with a new one or thoroughly cleaning it. This will help prevent leaks and maintain the system's integrity. Therefore, the sealing rubber will need to be removed for the following purposes:
- cleaning the cuff and its installation site from plaque, scale, dirt and debris;
- replacement of a part if it has stopped functioning and cannot ensure the tightness of the automatic machine.
Important! It's very easy to diagnose the need for a seal replacement. If you notice any damage to the seal's surface, an unpleasant odor coming from the gasket, or a leak during washing, you must remove the old seal immediately and install a new one.
Getting ready for work
Replacing the door seal on a Samsung washing machine yourself doesn't require any special tools or skills. To properly remove the seal, you simply need to understand the procedure, what to do at each step, and gather a set of tools that every household has:
- screwdriver;
- Phillips and flat-head screwdrivers.
If you don't have a screwdriver handy, you can still perform the entire procedure without one, but the process will require a little more effort. Once you've gathered the necessary tools and disconnected the power from the washing machine, you can begin the replacement process.
We remove the outer clamp
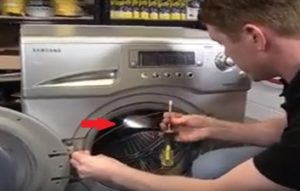 Removing the old seal is generally divided into two stages. First, the outer spring clamp is disconnected. To do this, using a flat-head screwdriver, slightly pull back the seal, pry up the clamp (in the part where the metal spring is located) and carefully pull it towards you.
The vast majority of Samsung washing machines have a metal clamp with a spring-loaded insert. By stretching this insert, the ring can be removed without damaging the structure. Some models are equipped with a plastic ring. In these cases, the clamp is secured with latches that are easy to open and close. After removing the outer clamp, detach the door seal from the outer wall of the washing machine and tuck the elastic band inside the drum to keep it out of the way.
We dismantle the inner clamp and rubber band
Next, release the sealing cuff from the second metal clamp, which holds the rubber seal to the inside of the unit. To do this, follow these steps: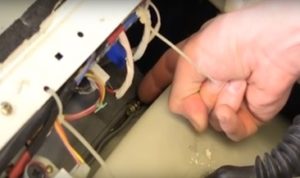
- remove the top cover of the washing machine by unscrewing the two bolts that hold it in place (they are located at the back of the washing machine, along the edges at the top);
- Loosen the steel ring by unscrewing the tension bolt securing the inner clamp. Don't unscrew the bolt completely, but only enough to allow the ring to pull out freely;
- After loosening the clamp, pull the sealing cuff together with the ring through the machine hatch door.
All actions must be performed very carefully so as not to damage the internal parts of the washing machine with the tool. If you only need to clean the seal and reinstall it, it is important not to tear the rubber.
If the gasket was removed from the housing for cleaning, thoroughly wash its surface using various disinfectants. Don't forget to clean the space that is opened after removal, as well as all the recesses on the previously closed surface of the drum. Typically, scale deposits accumulate at the location where the cuff is installed; special cleaning agents can help remove them.
We remove the front wall of the case
Installing the rubber gasket is the most difficult and time-consuming step. Installing the seal requires removing the front of the washing machine to gain access to the interior of the drum, where the gasket is secured. To remove all the screws holding the front panel of the washing machine, it's best to use a screwdriver; this will make your work much easier and speed up the process.
First, remove the three screws located on the bottom. To access them, try tilting the unit backward. The top of the washing machine's front panel is secured with screws underneath the main control panel, so you'll need to unfasten it and place it on top of the appliance. Another bolt can be found underneath the detergent dispenser drawer. Two more screws are located on the edges of the removed control panel. Once all the fasteners are removed, you can remove the front panel of the machine, gaining access to the drum.
Some technicians use a method of replacing the cuff without removing the front wall of the machine. This reduces the time required for the procedure, but the process of securing the elastic from the inside will be a little more difficult.
We put on a new rubber band
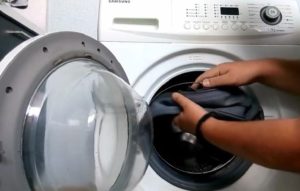 It's crucial to follow a specific sequence of steps here; this will prevent future problems with poor sealing and rubber leaks. The main stages of the final installation are as follows:
- insert the cuff directly with the inner retaining ring into the housing and place it on the drum protrusion located inside;
- carefully tuck the gasket with the clamp around the circumference;
- check that the inner ring of the rubber fastening is tucked along the entire length of the recess around the seal, then tighten the clamp screw all the way;
- tuck the outer part of the sealing rubber into the front of the machine;
- After the gasket is completely installed in its original place, put the outer clamp back in place.
Once the new or thoroughly cleaned seal is installed and secured, you can reinstall the front and top covers of the unit. Place the removed control panel and both sides of the unit back in place, securing them with the screws you removed at the beginning of the process. The seal replacement process is complete, and you can begin using your Samsung washing machine.
Interesting:


1 reader comment
Add a comment
Headings
Washing machine repair


For buyers


For users


Dishwasher


Very helpful tips. Everything is described in detail. I took it apart, checked everything, and put it back together myself! It works!