How to replace the door seal on a Zanussi washing machine
 If your washing machine door doesn't close properly or you notice water leaking, consider replacing the door seal. Most likely, the seal has become dislodged, damaged, or worn out—in any case, the problem can't be ignored. Anyone can fix the problem: just grab two flat-head screwdrivers, buy a new seal, and put in some time. All instructions and recommendations for Zanussi washing machine owners are provided in our article.
How to buy the right part?
The first thing you should consider is a new seal, or more precisely, choosing the right ring in terms of diameter and thickness. The easiest way to ensure you get the right size is to remove the old seal and take it to a specialist store. Even easier is to find the part number on the seal and tell the seller.
Another option is to find out the serial number of the washing machine that needs replacing and use it as a reference. For Zanussi and Electrolux machines, this marking is placed on a sticker located under the hatch. It is best to take a photo of the entire label in order to further clarify the model, year of manufacture, and industrial code if necessary.
In addition to the updated seal, you'll need a flat-head screwdriver, soap, round-nose pliers, and a cleaning sponge. That's all the preparation. All that's left is to replace the rubber seal on your Zanussi washing machine, following the instructions below.
Removing the old rubber
Simply removing the seal and replacing it won't work. The cuff is securely fastened with two clamps—an outer plastic one and an inner metal one—which must be carefully removed. To do this:
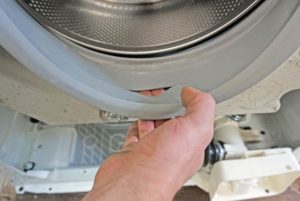
- find the outer ring;
- we pry it up with a flat screwdriver, pull it to the side and remove it;
- we bend back the edge of the cuff and get to the inner clamp, which in Zanussi machines is a solid spring;
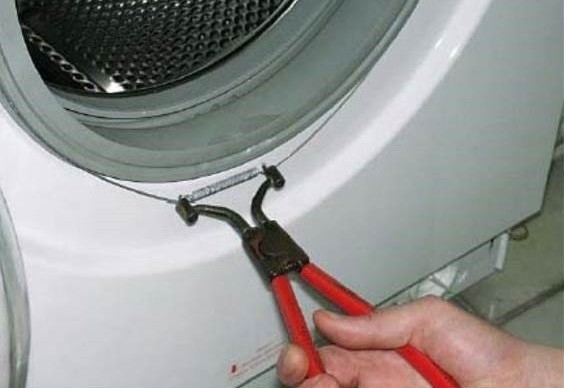
Important! Some Zanussi models have screw-type clamps. To remove them, simply loosen the fastener and remove the clamp.
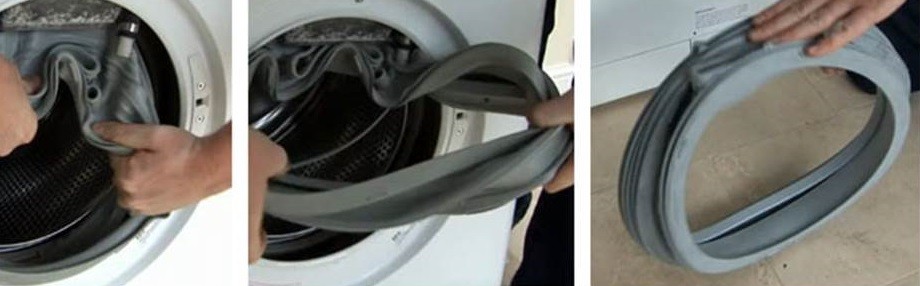
- We pull the edge of the cuff towards ourselves with one hand, and with the other we help the elastic band move away from the tank.
Now you can carefully inspect the seal and identify the cause of its damage. This will help you take better care of your new tires in the future and extend their lifespan. Now let's discuss the next steps.
We put the part
Pulling and securing the cuff is much more difficult than removing it. It's best to find an assistant, as the extra hands will help you complete the installation faster. It's also a good idea to practice on your own with the elastic removed earlier—you can rehearse the upcoming steps. What will the process look like next?
- Preparing the site. Take a sponge, soap, and water and thoroughly wash the planting area. There is no need to completely wash off the resulting foam – the slippery surface will make installation easier.
- Tensioning the elastic. First, find the mounting marks and align them. Next, place the cuff in the recess and use your thumbs to tighten it, moving it in a circular motion in both directions. This will prevent it from slipping or shifting.
- Installing the inner clamp. If the ring is a screw-type, installation is simple: loosen it to the desired diameter, place it in the grooves, and tighten the screw. Spring-loaded fasteners are more complex to install. First, tuck the ends of the collar into the drum, unscrew the hatch lock on the housing, and insert a screwdriver into the freed keyhole until it is secure. Then, place the spring on the tool and tighten it around the entire circumference of the hatch using another screwdriver. Then, remove the retainer and replace the lock.
Caution! Use the screwdriver with extreme caution, as the rubber seal can be easily damaged.
- External fastening. The second clamp is easier since access to the mounting surface is not blocked. The procedure is the same: with a spring clamp, place the ring on one side, hook it on the opposite side with a screwdriver, and gently tighten it around the perimeter. With a screw clamp, loosen the fastener, install the clamp, and tighten it securely.
Older Zanussi models may feature a different type of clamp, equipped with special hooks. These are separated with round-nose pliers and then tightened in a similar manner.
It remains to evaluate the quality of the repairs carried out. We compare the conformity of the mounting rails and the tightness of the cuff fit. Finally, turn on the machine, select the rinse mode, and start the cycle. Once the cycle is complete, tilt the machine back and inspect the bottom and floor: there should be no traces of water, puddles, or drips.
Why does the rubber band deteriorate?
 While replacing the door seal is simple, no one wants to do it regularly. Therefore, we recommend examining the old seal and determining the cause of its deterioration. It's important to understand that the seal has a wear lifespan and, with regular use of the washing machine, will gradually and inevitably wear out. The following factors accelerate the deterioration process.
- Careless installation. It's already been mentioned that it's easy to puncture the ring with a screwdriver.
- Aggressive detergents. Many powders have unsafe compositions that have a detrimental effect on rubber.
- Friction. This refers to both the contact of the seal with other parts of the machine and with the laundry itself.
- Hard objects. Sharp objects, coins, keys, and heavy shoes entering the drum can damage the drum seal.
- Carelessness. The rubber band often gets damaged due to careless loading and unloading of items.
- Mold and mildew. If you don't dry your washing machine after each wash, a film can form on the rubber surface, which can eventually corrode the structure of the material.
By following the washing machine's operating instructions, you can postpone the need to remove the seal for a long time. However, even if the door seal is clearly damaged, don't despair—replacing the damaged seal is quite easy. The main thing is to follow the instructions and proceed with extreme caution.
Interesting:


Readers' comments
Headings
Washing machine repair


For buyers


For users


Dishwasher


Add a comment