How to change a hose in a washing machine?
 A worn or clogged hose can cause serious problems. The washing machine will simply stop working properly – it won't be able to fill the tanks or drain waste water. This usually results in the machine freezing and displaying an error code. You can replace a washing machine hose yourself, without calling a professional. To do this, you need to determine which hose is damaged. Let's look at where the hoses are located and what functions they perform.
Where are the pipes located?
Modern washing machines are similar in design. Every machine, regardless of brand, has a filler and drain hose, as well as a dispenser hose. Three pipes work in a coordinated manner, ensuring water circulation in the system. Let's figure out what the function of each element is.
The inlet pipe connects the inlet valve and the detergent drawer of the washing machine. Water flows quickly through it and into the drawer, where it combines with the detergent. The soapy liquid then flows through the dispenser hose into the washing machine's drum. When the waste water needs to be removed from the drum, the drain pipe comes into play. This is where the liquid flows into the sewer, passing through the waste filter and the drain hose.
Any of the three hoses in the machine may become leaky or clogged, which will prevent the washing machine from working properly.
New washing machine models are equipped with very durable and flexible hoses. However, over time, these hoses begin to harden, which can lead to cracks and leaks. The hose connecting the detergent drawer to the tank can become caked with deposits from poorly soluble detergents. These granules quickly harden, preventing the free flow of water.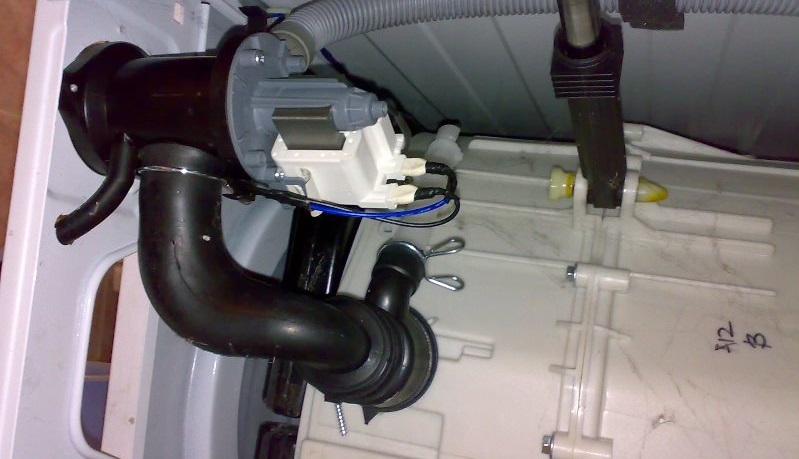
The drain hose is the most vulnerable. It collects all the debris contained in the wastewater, including threads, hair, lint, sand, and so on. Items left in pockets, such as coins, keys, hairpins, and toothpicks, can also get stuck inside the hose. Sometimes, a sock that has fallen from the tank into the drain system can clog the hose.
To determine which hose needs replacing, you need to monitor the washing machine's operation. If water is entering the drum poorly or not at all, you'll need to inspect the inlet hose and dispenser tube. These same components should also be addressed if the machine begins leaking immediately after starting a cycle. The drain hose should be suspected if the machine is unable to drain waste water from the drum. It's also worth inspecting if a leak appears just after the drain cycle has started. Let's figure out how to do the job yourself and where to start.
Turn off the machine and clean the filter.
It doesn’t matter which pipe needs to be replaced; in any case, you can’t do it without disassembling the machine body. Before starting work, be sure to disconnect the power to the washing machine and turn off the shut-off valve responsible for the water supply. It is also important to drain the remaining fluid from the system, to do this:
- prepare a shallow container;
- cover the floor around the machine with dry rags;
- Access the waste filter. On front-loading models, it's located in the lower right corner. To access the filter, you'll need to either remove the trim panel or open the access hatch, depending on your washing machine model.
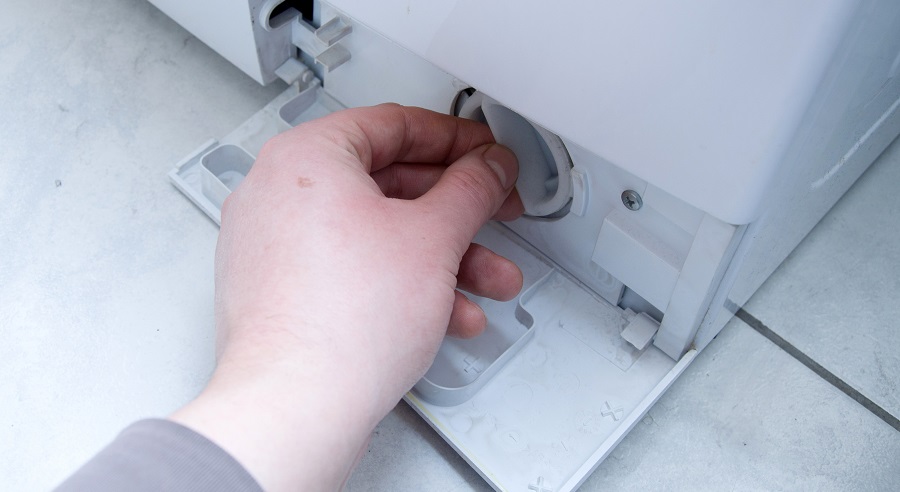
- Tilt the machine back, place a basin under the body in the area where the filter is located;
- unscrew the plug half a turn, collect the flowing water in a container;
- remove the coil from the hole and wait until all the liquid has drained out.
It's best to clean the filter immediately, rinsing it in warm, soapy water and removing any dirt from the hole walls. Now you can begin the repair itself. You can inspect the inlet pipe and dispenser hose by removing the top cover. To inspect the drain pipe, you'll need to lay the machine on its side.
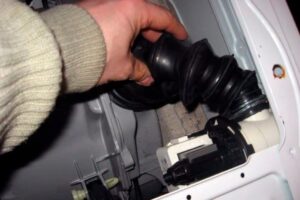
Dispenser nozzle
If you notice clear water collecting under the machine, the first thing to check is the dispenser hose. To check this element, you need to remove the top cover of the washing machine.
The dispenser pipe is located in the left corner and connects the inlet valve and the powder receptacle.
It's hard to miss the hose. It's secured with clamps on both ends. You can check that the dispenser hose is working properly as follows: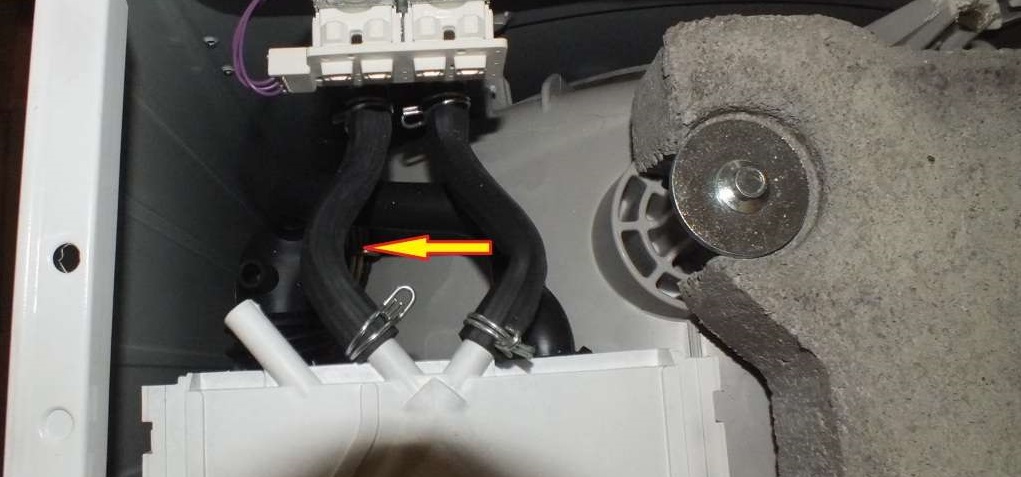
- Use pliers to loosen the clamps;
- Slide the clamps toward the center of the hose. Handle the clamps carefully; they will be used to secure the hose later.
- first remove the tube from the inlet valve, then from the outlet of the detergent tray;
- Inspect the pipe for cracks and make sure there are no blockages inside.
Once everything is in good condition, simply rinse the dispenser hose under warm running water and reinstall it. It's a good idea to clean it with a bottle brush. If you notice any cracks in the rubber, purchase a new hose that matches your washing machine model. Secure the entire hose in place with clamps. You'll also need to replace the hose if the previously soft hose has hardened and feels "wooden."
The water supply pipe is leaking
On some washing machine models, such as LG, removing the water supply hose is easy. To do this, simply remove the top cover, loosen the clamps, and pull out the hose. However, sometimes access to the hose can be difficult, requiring removal of the front panel of the machine. The procedure is as follows:
- de-energize the machine;
- turn off the water supply tap;
- remove the top cover by unscrewing the screws that secure it;
- remove the powder container;

- Unscrew the control panel fasteners;
- unhook the dashboard and place it on top of the washing machine;
- remove the lower false panel by releasing the latches;
- Remove the outer clamp of the hatch cuff. To do this, use a screwdriver to pry up the latch and remove the "ring";
- tuck the sealing rubber inside the drum;
- Unscrew the 2 bolts securing the hatch locking device;
- remove the front panel of the front camera case.
The water supply hose runs from the dispenser to the tank. To remove the hose:
- remove the retaining clamps located at both ends of the hose;
- first unhook the tube from the cuvette outlet, then from the tank.
Next, carefully inspect the element. If you notice any damage, you'll need to purchase and install a new hose. If the hose is clogged, clean it with a long, thin brush or simply replace the part.
Pipes between the tank and the pump
The drain hose is the most common component washing machine owners face. It's a vulnerable part, handling tens of liters of soapy, dirty water with each wash. It's no wonder it's the first part to wear out.
The drain pipe is changed through the bottom, so you need to carefully lay the automatic machine on its side.
Some washing machines have an open bottom, so the drain hose can only be found immediately after laying the machine horizontally. If the machine has a drip tray, you'll need to unscrew the screws and remove it. The drain pipe is connected to three elements at once: the tank, the pump and the pressure take-off hose.
To remove the hose, unclip the clamps at all three points and pull the hose to the side. Inspect the rubber bellows—if it's intact, clean it with a brush, rinse it under running water, and reinstall it. If you find any cracks, replace it immediately. If the old hose is intact but heavily soiled, soaking it for two hours in water with citric acid can help. You'll need just 100 grams of citric acid per two liters of liquid. Afterward, rinse the hose under the tap and reinstall it.
Preventing clogged hoses is within everyone's power. It's best to install a deep-cleaning filter upstream of the machine's inlet to ensure clean water flows into the system. It's also important to use only high-quality detergents so they dissolve completely and don't settle inside the hoses. You should also inspect the pockets before loading items into the drum and remember to clean the drain filter regularly (every six months).
Interesting:


2 reader comments
Add a comment
Headings
Washing machine repair


For buyers


For users


Dishwasher


My LG washing machine washes but doesn't spin. It tries to spin the drum and then stops. The pump runs constantly. Could this be due to the heating element?
No, it's a faulty tachometer sensor, which controls the engine speed. The brushes could also be worn out.
The heating element has nothing to do with it.