How to replace a drum bearing in a Candy washing machine
 Like any other brand, Candy washing machine components and assemblies wear out over time, causing unusual noises (humming, grinding, and grinding). Frequency and intensity of use don't reduce, but rather intensify, the unpleasant sound. Don't panic! A common problem that causes this discomfort is bearing wear. For proper and stable operation, replacing the drum bearing on a Candy washing machine is necessary. The process isn't particularly difficult, but it's worth the effort.
What causes bearings to fail?
If a part fails, it's important to determine the cause. This information will facilitate repairs and help prevent recurrence. Part wear may be caused by:
- long-term operation of the installation (metal parts have a certain service life, after which the manufacturer allows for their breakdown);
- corrosion caused by moisture getting into the bearing;
- Design features – the belt drive places significant stress on small parts, which can lead to significant damage to their surface layer.
Failure to promptly replace worn bearings and seals will result in malfunction of other components, leading to complete machine failure. Repairing such a unit will be more difficult and expensive. A new washing machine would be cheaper.
We are starting to prepare for the renovation.
Before beginning repair work, it's important to prepare both the tools and materials, as well as the machine itself. First, disconnect the machine from its power lines and move it to a clear space that allows the technician access to all components. It is recommended to choose uncluttered spaces (rooms, outbuildings, garages). The next step is preparing the tool. To perform simple manipulations, you will need:
- hammer;
- hand tools for metalworking and assembly purposes – pliers;
- two Phillips and slotted screwdrivers;
- metal rod;
- set of open-end wrenches;
- one-component sealants;
- lubricants that prevent corrosion (alternatively - lithol);
- a pair of bearings, oil seal (sold in service centers or specialized retail outlets).
To avoid choosing the wrong parts, it's worth following the advice of an experienced technician. Disassemble the unit to determine the bearings used in your Candy washing machine. With this information, the salesperson will be able to recommend the right consumables. Tell the salesperson the brand of your machine.
Purchasing original spare parts for a specific Candy washing machine model will ensure the smooth operation of the unit for a long time.
When performing DIY repairs, it's a good idea to use a camera. It allows you to easily monitor the proper assembly of components after the repair is complete.
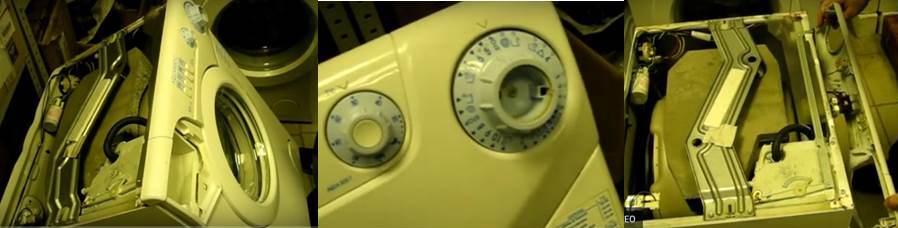
Gaining access to the tank
Disassembling the Candy machine should begin with removing the top cover. To do this, release the screws holding the rear panel in place. Gently slide the top panel back and slowly release it. This step shouldn't cause any difficulties. To access the drum, remove the following:
- upper counterweight;
- side upper panels on the left and right (not secured, can be pulled out with a slight upward movement);
- front panel (held by two bolts on both sides of the structure), carefully disconnect the connected wires;
- hoses connected to the powder tray;
- pressure switch;
- control unit (held by two bolts, pay attention to the correct disconnection/connection of the main wires);
- rheostat (held by one bolt);
- a cuff on the tank door, held in place by a clamp-latch;
- receiving tray for detergents (held with a screw);
- pipes holding the powder receiver (bottom left, behind the cuff);
- the tube leading to the rheostat;
- Heating element, tube, motor, temperature sensor (at the bottom, near the tank);
- a wire that reads the number of rotations of the drum;
- mounting bolt (bottom left);
- a drain pipe from a barrel held in place by a clamp.
When disconnecting wires (control unit, heating element, temperature sensor), carefully note their location and color to avoid mistakes during reassembly. For clarity, it is recommended to use colored markers. All work requires care and caution, checking the connections and following the correct sequence.
Before you begin removing the tank from the housing, you should disconnect the pulley, recheck the possible mounting locations and ensure that there is sufficient free space. The machine door must be open so as not to interfere with the removal of the unit. If there are no obstructions, the drum can be removed by unhooking it from the side springs and lifting it upward. The unit is quite heavy (partly due to the lower counterweight), requiring considerable strength or a friendly hand.
To lift the drum, skilled mechanics use a towing strap from a car or a strong rope. This device, attached closer to the front of the unit, makes it easier to remove and replace the drum.
Let's take a look inside the tank
To continue disassembling, remove the rubber seal and lower counterweight from the tank. This will expose the bolts holding the lid in place. After loosening these components with a small ratchet, remove the lid and set it aside.
The next step is removing the drum. To do this, place the tank on its side (the operating position when the unit is assembled). Using a hammer and gentle blows on the shaft, tap the drum loose and free it from the frame.
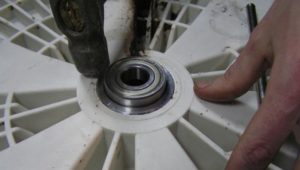
The next step is to inspect the bushing and shaft. Using a clean rag, remove grease and dirt from the shaft. This will help determine the degree of wear and eliminate any potential damage. Any wear detected indicates replacement of the parts. These steps lead to the fitting of new bearings.
The presence of play is grounds for replacing the crosspiece.
The process of determining the condition of the shaft sleeve is mandatory. This structural element is designed to accommodate the seal. Significant wear and clearly visible transverse grooves indicate replacement. If left unattended, these factors will lead to constant moisture leaks, which will quickly and significantly impact the condition of the new bearing.
Replacing a part
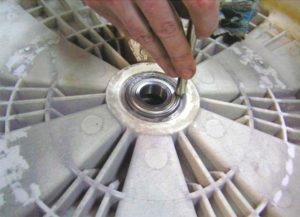
 The bearings requiring replacement are located on the rear wall of the removed drum. Before removing them, the seal must be removed. To do this, use a straight-head screwdriver to simultaneously pry and remove the seal, which is then thoroughly inspected and replaced if necessary.
The next step is removing the inner (small) and outer (large) bearings. This process is performed using a punch (a metal rod) and a hammer. The outer bearing is knocked out first, and the inner bearing is knocked out second.
Next, ensure the new parts are installed in a clean seat. The small bearing is installed first, followed by the large bearing. The parts are also driven in using a metal rod, installed in a crisscross pattern. The dull sound the part makes during driving becomes louder once it's installed correctly.
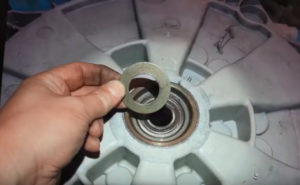 Before installation, the oil seal must be treated with a water-repellent lubricant. The installed part is a signal to assemble the washing machine in the reverse order of how it was disassembled.
Experts claim that replacing bearings in a Candy washing machine is not a very difficult process. The key is consistency, caution, and attention to detail, especially delicate ones. Advice for those unsure of their abilities: seek professional help. However, remember that having a professional replace the bearings will cost money—approximately 30% of the price of a new Candy machine.
Interesting:


1 reader comment
Add a comment
Headings
Washing machine repair


For buyers


For users


Dishwasher


Good, useful article. Thank you.