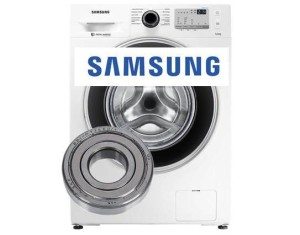
How to replace a bearing on a Samsung washing machine
 Any Samsung washing machine model is known for its good quality and long service life. No matter how good the machine, there comes a time when it requires attention. Bearings, in particular, often fail. It might seem like a simple matter, costing pennies and easy to replace. But it's not that simple: you still need to properly access the bearing and then remove it without damaging anything. Now that's a challenge!
What do we need for repairs?
Bearings in Samsung washing machines are not repairable, but replaceable, so the first step is to ensure you have the necessary components. Currently, you can find bearing repair kits specifically for Samsung washing machines on the market. They come in a single package containing:
- bearings;
- oil seals;
- special lubricant.
There is one catch though, Repair kits are available for different washing machine models, so to avoid any confusion, you need to know which bearings are compatible with which washing machine models. To avoid mistakes, our specialists have prepared a list of components for your Samsung washing machine. By reviewing it, you can confidently purchase original bearings and begin replacing them.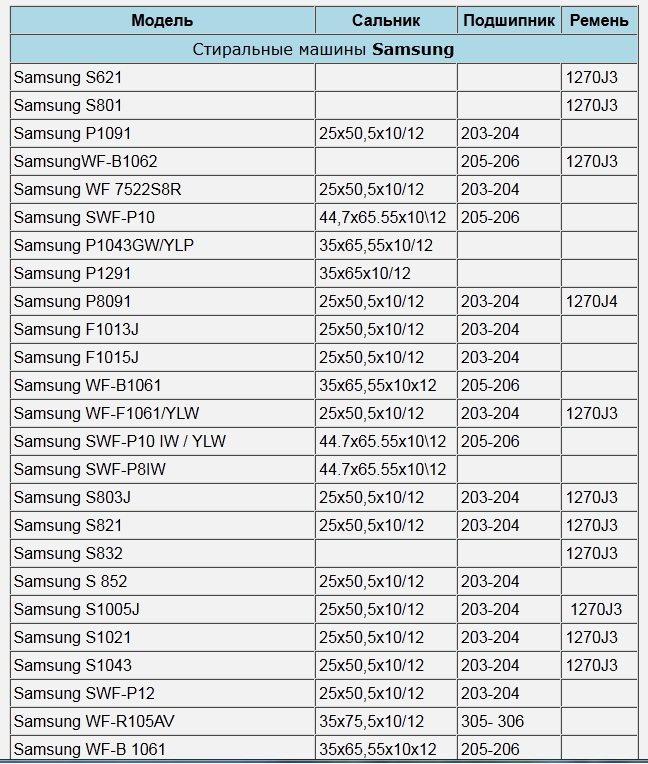
In addition to the components, you'll also need tools. To remove the fasteners, unscrew the tank, and knock out the bearings, we'll need:
- copper hammer;
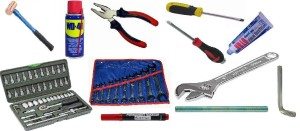
- special lubricant for washing machine elements or WD-40 liquid;
- bent hex key;
- marker;
- steel stud or metal tube;
- round-nose pliers or flat-nose pliers;
- small adjustable wrench;
- wrenches (open-end and socket);
- screwdriver indicator, Phillips and flat;
- any sealant.
We take out the tank
Now that we've found the tools and purchased the components, we can prepare a comfortable work area and begin disassembling the Samsung washing machine ourselves. The second step is to remove all unnecessary items from the washing machine so they don't interfere with the drum removal. This must be done in a way that prevents damage or loss, so place all removed parts in separate piles. So, let's begin disassembling.
First, remove the top panel (cover) from the car. To do this, unscrew the two fasteners that hold the cover in place. They are located at the top of the rear panel at the corners. Then, place both palms on the top panel and pull it toward you, then lift it up.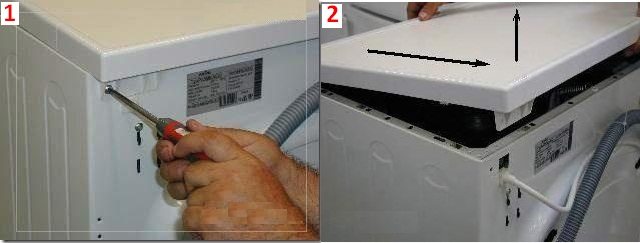
Next, remove the powder drawer. This is necessary to prevent water from spilling out and splashing onto the electronics when tilting and turning the machine. Removing the drawer is easy:
- you need to open it all the way;
- press the “tongue” of the central section with the finger of one hand;
- at the same time, with your other hand, slightly lift the cuvette and pull it towards you;
- If everything is ok, the cuvette should pop out and remain in your hands.
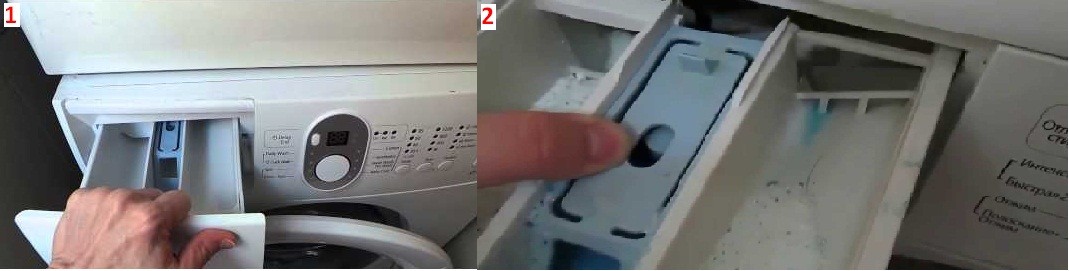
After removing the powder tray, unscrew the hoses supplying water to its sections, as well as the hose through which water and powder enter the tank. Remove the hoses carefully to avoid damaging the clamps. Loosen the clamps with pliers and then tighten the hoses.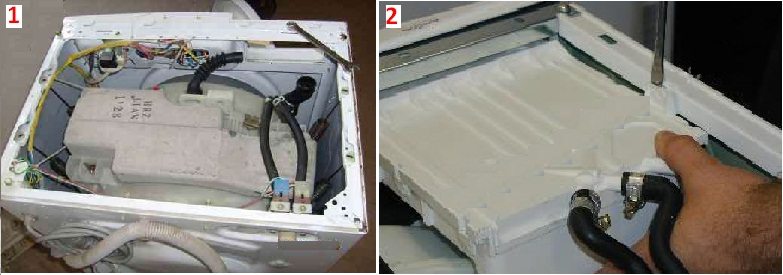
Next, we need to remove the large upper counterweight that's in the way. To do this, use a socket of the appropriate size and unscrew the two fasteners. Then, carefully holding the counterweight, remove it and set it aside.
Important! When loosening the last bolt with one hand, be sure to hold the counterweight with your other hand, as it is very heavy and could slip, damaging important parts of your Samsung appliance.
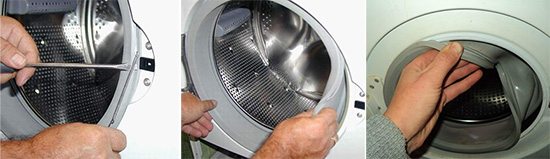
Now let's move on to the front panel of the Samsung washing machine. We need to remove it ourselves, but to do this, we'll need to properly remove the rubber seal without damaging the door locking system. What needs to be done?
- We unscrew the two fastening elements of the hatch locking device.
- Then we disconnect its sensor so as not to tear off the wire when removing the cuff.
- We screw the bolts back in so as not to lose them.
- We take a screwdriver, find the steel cable of the clamp at the base of the cuff and pry it out.
- We slide a screwdriver under the clamp, pulling it out of its groove. Our goal is to find the clamp's fastening element so we can loosen and remove it.
- We loosen the bolt and remove the clamp from the cuff.
- We put our fingers under the hatch cuff and carefully pull it towards us.
You don't have to pull the cuff all the way out, as long as it doesn't interfere with removing the front panel. Leave the front panel alone for now. Now we need to lay the Samsung washing machine on its side to remove its bottom. To do this, unscrew the four fasteners holding the bottom panel in place and remove it.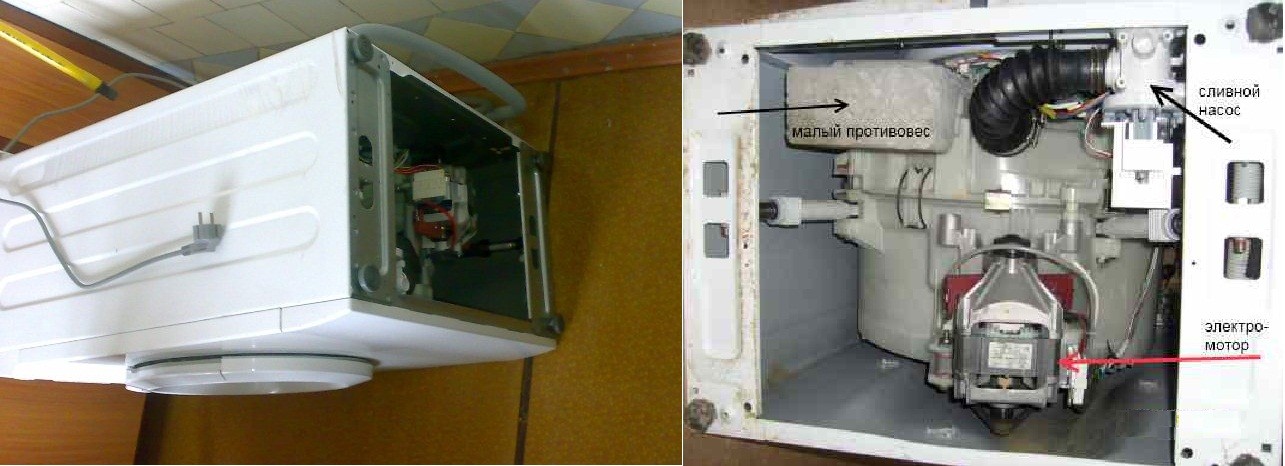
Now let's tackle the electrical system. You need to disconnect all the wires from the Samsung washing machine's motor and drain pump. It would be a good idea to film the electrical work process, as it's easy to get confused with the wiring. If this is not possible, you can simply make marks with a marker.
Please note! The contacts connecting the wire to the unit sensors are quite flimsy, so be careful. If you find a burnt wire or contact, replace it immediately.
Let's move on to dismantling the stands supporting the washing machine's drum. To do this, you need to unscrew the four fasteners that secure one end of the stand to the drum and the other to the bottom of the machine. We won't need to remove anything else from the bottom except the motor. The drain pump won't interfere; we just need to disconnect its hoses.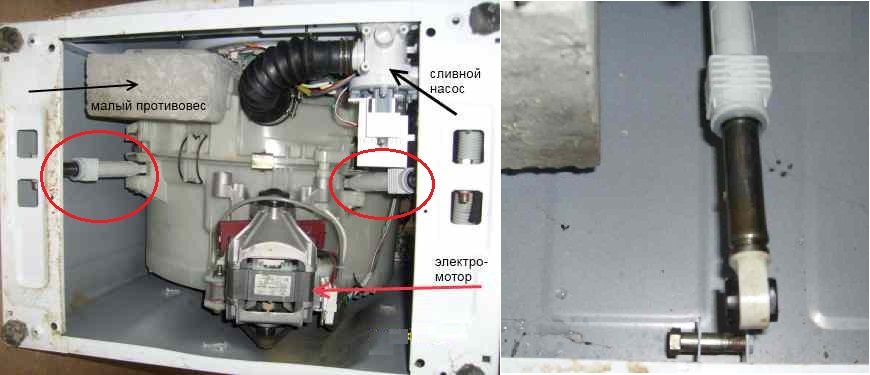
Leaving the machine on its side, we move on to the top. Now we need to remove the fill valve along with its sensors and hoses. Disconnect the wire leading to the valve's sensors and then unscrew the bolts holding it in place. After that, remove the valve and set it aside. Disconnect the counterweights, which are the four springs that support the tank.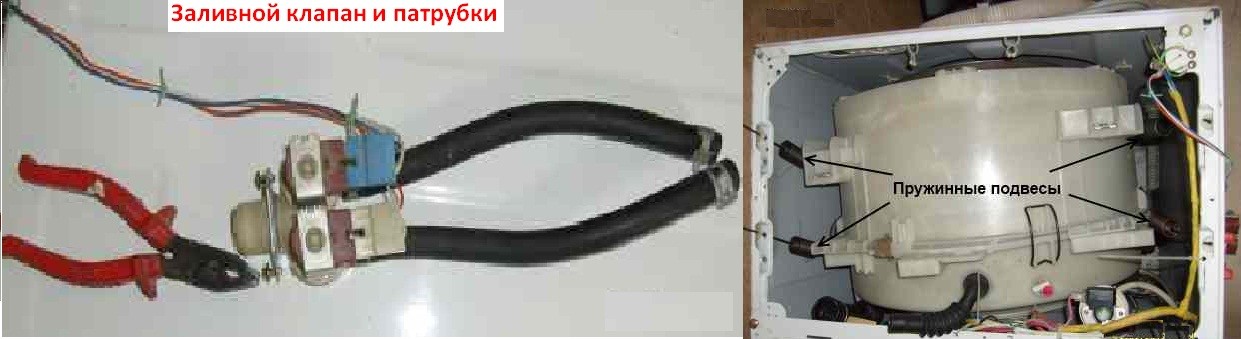
The path for the tank to exit through the top of the case is almost clear, all that remains is to remove the front panel and the wall. Unscrew the five screws holding the front panel in place and remove it. In doing so, try not to damage the control unit by tearing off the wires. Next, unscrew the front panel, removing a total of 10 fasteners, and set it aside. You'll see another small counterweight underneath the tank; this should also be removed to keep it out of the way.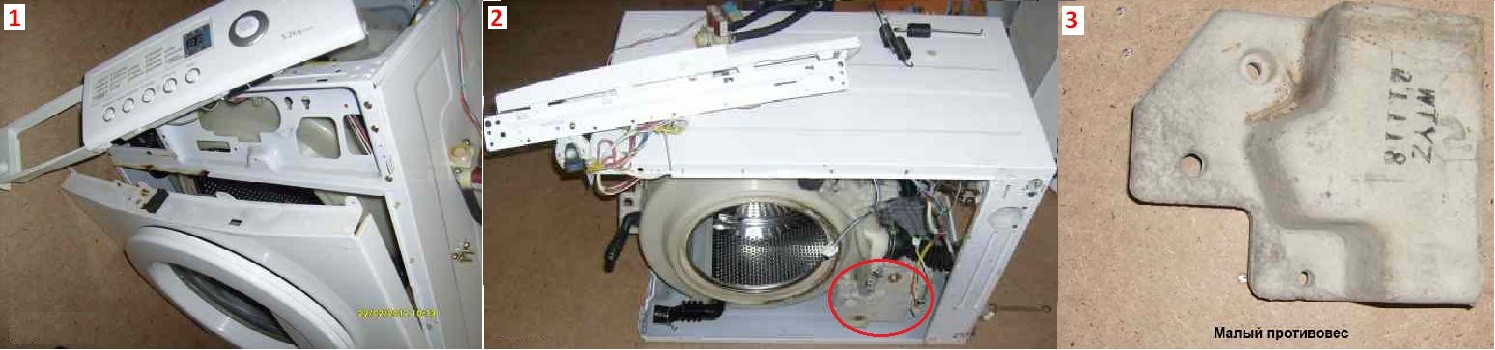
We've unscrewed everything that could interfere with removing the drum. Now we need to very carefully pull the drum and motor out of the Samsung washing machine. Removing the drum, drum, and motor is a very sensitive process; you could damage a contact, which would be a lot of work. Turn the drum over, remove the belt from the pulley, and then use an Allen key to unscrew the pulley itself.
Please note! The fastener holding the pulley may seize, so to avoid applying excessive force and risking stripping the threads, lubricate the bolt with WD-40.
 The drum is removed, and now you can move on to the next stage of disassembly. Disassembling a washing machine can seem complicated for a beginner, so we recommend filming it so you can see what goes where.
We unscrew the tank and change the bearings
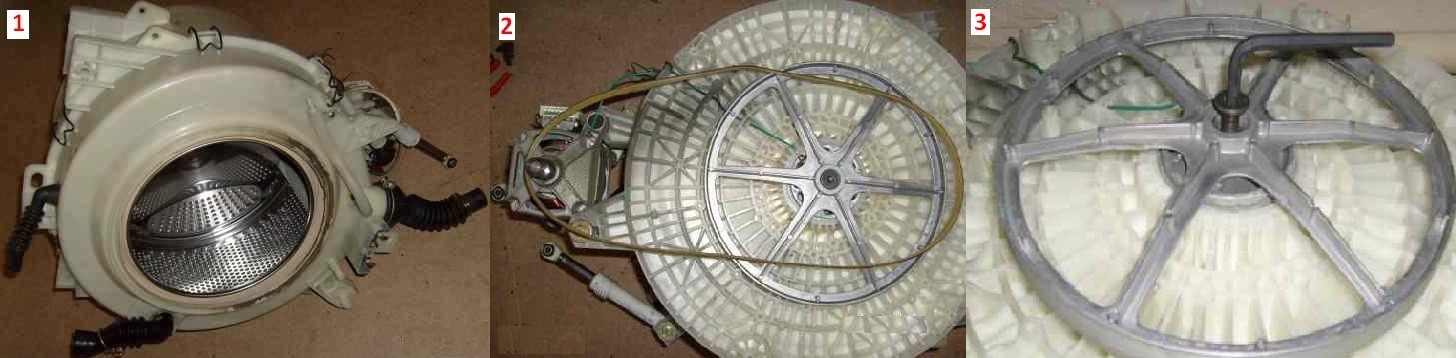
Let's begin disassembling the Samsung washing machine's drum and removing its drum ourselves. We removed the stands that hold the drum earlier by unscrewing the fasteners connecting them to the drum body. These fasteners not only hold the stands but also connect the two parts of the drum body, so we've already unscrewed the main connecting elements, leaving only the brackets and clamps. The brackets and clamps can be removed with a screwdriver or open-end wrench; they're usually easy to remove.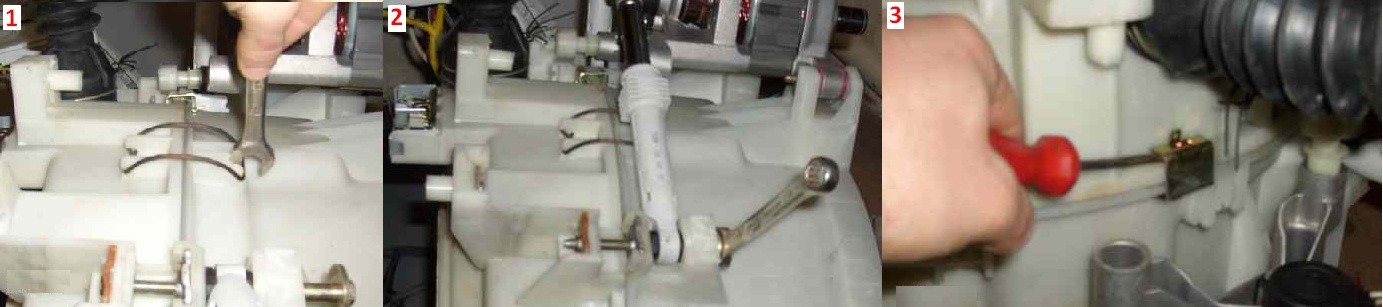
We remove the top part of the tank housing, exposing the drum. Now we remove the bottom part of the housing. This leaves three large components:
- the upper part of the tank body with a hatch opening in the middle;
- the lower part of the tank body with a heating element;
- drum body with axis.
Don't focus solely on bearing repairs. Check other parts of the machine as well, so you don't have to disassemble it again later. In particular, it's a good idea to check the inside of the tank and the heating element for scale. If there is any, clean it immediately. The heating element should definitely be cleaned; you can also check it with a multimeter. If there are any problems, the heating element needs to be replaced.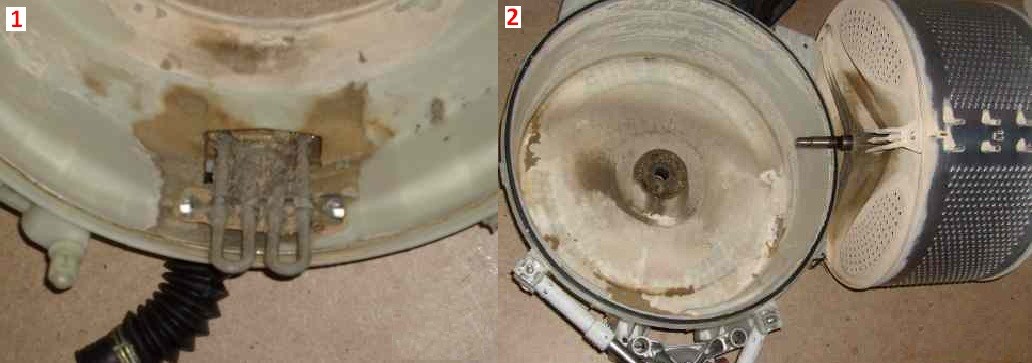
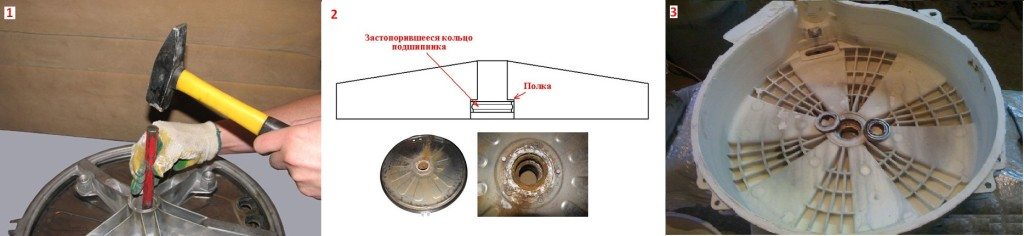
Let's begin removing the bearings. The aluminum sleeve of the tank body contains two bearings: a large one and a small one. The large bearing should be knocked out from the outside to the inside of the tank body using a pin, the small one is knocked out from the inside of the body to the outside. Take a pin, place it on one end of the bearing, and give it a light tap with a hammer. Place the pin on the other end and give it another light tap, and repeat the process until the bearing pops out.
Important! When knocking out a bearing, never strike it in one spot. Instead, strike three or four spots in turn. Otherwise, the bearing will become crooked and become stuck in the bushing, which can be problematic.
 Remove the worn seals and thoroughly wipe the inside of the bushing with a clean cloth. Take the new seals, lubricate them with the special grease from the repair kit, and insert them. Take the bearings and press them into place until they touch the flanges. Install the bearings as follows:
- we place the bearing into the bushing and try to seat it with our fingers as much as possible;
- take a wooden block and place it on top of the bearing;
- We hit the block several times with a hammer until the bearing sits in place.
That's it, the bearing replacement was successful. Now all we have to do is reassemble the washing machine in reverse order. This is where the video we shot while disassembling the machine and the marker markings will come in handy.
Typical mistakes of a DIYer
Trying to replace the drum bearings of a Samsung washing machine on your own, DIYers often make mistakes that, as a result, complicate repairs and require additional costs. What are these errors?
- Tearing off the wire that goes to the sensor blocking the hatch.
- Rupture of the washing machine door cuff.
- Damage to the pulley during the process of removing it from the axle.
- Breakage of fastening bolts.
- Tearing off the wires going to the temperature sensor and heating element.
- The pipes are torn off due to the clamps not being loosened enough or being forgotten to be loosened.
- By knocking the bearings out of the drum, the bushing is broken, and everything ends with replacing the drum.
You need to be aware of these typical mistakes and never repeat them, because replacing a drum is a serious expense, and can be even worse.
In conclusion, replacing the bearings that power the drum of a Samsung automatic washing machine is not easy, but it is possible. The key is to find out what bearings are installed in your model, purchase the original parts, select the right tools, and then roll up your sleeves and follow the expert instructions outlined in this article. Happy repairing!
Interesting:


23 reader comments
Add a comment
Headings
Washing machine repair


For buyers


For users


Dishwasher


The video is very good, it helped me replace the bearings myself.
I second the previous comment. It really does help. The parts are different, of course, but the principle is well explained. If you're handy with appliances and have a store that sells appliance parts, you can give it a try. The only thing you need to be patient with is that the process will take a while (I had a hard time knocking out the bearings, for example), and then there's the piles of dirt that need to be removed... But overall, I'm satisfied. A couple of bearings, a seal, and grease cost $12, which isn't bad considering the $70 cost of a professional repair.
Did you change the drum sealing ring? Or did you seal the gasket with sealant?
The video recommends replacing the gasket ring in the fuel tank. It costs 2900 rubles.
Very accessible and understandable. It was really helpful. Thanks to the video creator.
Sorry, I was misled. The seal costs 2900 rubles. They don't even sell gaskets. I recommend getting small bearing clamps with this tool kit. It took me about two hours to remove the 204 bearing from the activator shaft with a chisel and other tools. A light hammer blow wouldn't remove the activator. I had to apply force until the bolt bent, but the inner bearing remained stuck on the shaft. You need to remove it carefully to avoid damaging the seal seat and breaking the silumin crosspiece of the activator. It was quite a struggle, even though I'm a 6th-grade electrical mechanic. I have experience removing bearings. Before pressing the bearings in, lubricate the bearing seats and shaft with grease, and everything will be easy and straightforward. Unforeseen problems always arise during work, which are unavoidable. Of course, I'm grateful for the video. Thank you! The repair cost 1000 rubles. + beer after work. Good luck, master!
Hello. The large bearing won't come out. What should I do?
Did you manage to get it? Share how!
A hammer didn't work, so a hammer drill in impact mode helped. I recommend it.
Very good video! Everything turned out well!
Good video. Thanks to the master.
Very detailed and accessible. Thank you.
The video was helpful; the mechanic explained everything clearly. The problem was with the oil seal; it was completely rotted. I had a hard time cleaning the seat. The bearings came out fairly easily. The new ones went in without any problems. The hardest part was finding the repair kit. Service centers aren't always willing to sell even the most basic item—oil seal grease.
If they don’t sell, it means they don’t have enough work, but for us, selling is easy!
While removing the rotted oil seal, I loosened the mounting space underneath it. There's no way to press the new seal in tightly; it's easily inserted and removed by hand. Is there a proven solution?
Thanks for the video. Very useful!
I have the same problem: the oil seal housing is water-eaten. The seal doesn't fit tightly. Should I use epoxy or sealant to secure it in place? What are the options?
It's crucial to clean the sealing area; if you leave deposits, corrosion will continue underneath. For sealing, use Kazan silicone automotive sealant, only the gray one! It sticks even to wet surfaces. After drying, it's almost as hard as rubber. Generally, a conical mandrel is made to increase the seal diameter. It's a hollow cone. It's slightly pierced from the inside, stretching the inner edge of the race. It's important not to overdo it. And still, use the sealant.
Hi, try covering it with sealant.
The video was very helpful! Thank you!
Thanks for the video. Everything is very accessible and understandable.
A true professional. I'd trust him to fix anything. Thank you for the detailed repair instructions.
Everything was done in the same way, the only thing I entrusted to a specialist was pressing in the bearing for $5.
Thanks to the master!