How to Replace Bearings in an AEG Washing Machine
 Some washing machine components wear out over time and stop functioning at full capacity. Bearings are no exception. A few years after purchasing your washing machine, you may notice noises, knocking, and vibrations. If left untreated, the usual grinding noise will develop into an annoying roar.
Replacing bearings in an AEG washing machine is a rather labor-intensive process. The ideal option is to send the machine to a repair shop, where professionals will perform the repair quickly and efficiently. However, you can save money and try replacing it yourself; our instructions will help you do just that.
We're trying to get to the tank.
To remove the bearings yourself and install new components, you'll need to disassemble the washing machine's tank. This requires removing the element from the machine's housing. This isn't an easy process, as it requires removing many parts from the machine.
We recommend that you have a camera handy and capture the process of disassembling the equipment; this will help you reassemble the unit without errors later.
To access the drum and remove it from the washing machine without any problems, follow these steps:
- Remove the top cover of the case. To do this, use a standard Phillips-head screwdriver to unscrew the two screws holding the wall in place;
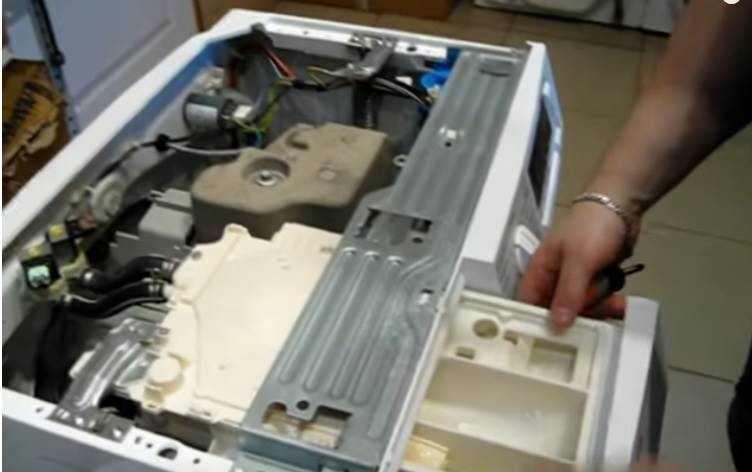
- remove the detergent drawer;
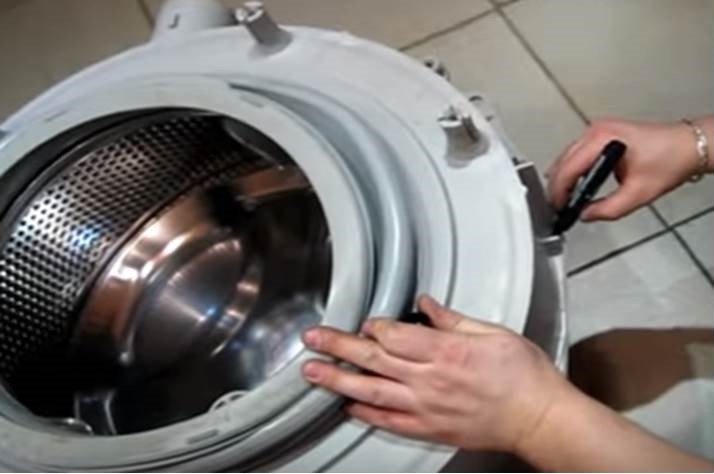
- remove the sealing rubber that encircles the hatch - loosen the clamp holding the cuff and insert it into the drum;
- Remove the control panel by unscrewing all the screws holding it in place. To keep the panel out of the way, carefully move it aside. Be careful not to break the contacts;

- remove the top metal strip;
- unfasten the lower false panel located on the front wall;
- Remove the screws holding the front of the housing, located at the top and bottom of the wall. When you pull the cover toward you, you'll see the contacts for the hatch locking device. You'll need to remove the cover and pull out the locking device wire. Then, pull the wall apart and set it aside.
- Disconnect the front and top counterweights of the washing machine;
- remove the drain pipe;
- unfasten the tank shock absorbers;
- disconnect the pipe from the pressure switch and remove the water level sensor;
- Unscrew the dispenser from its mountings and remove the fill valve by pushing it into the housing and turning it to the right. Set the dispenser and valve aside.
- Disconnect the power line filter;
- Remove the back panel of the machine, remove the drive belt from the pulley, disconnect the contacts leading to the heating element, as well as the motor wiring.
By following these steps, you'll gain easy access to the washing machine's tank. Now, carefully remove the element from the machine's body.
Preparation and disassembly of the tank
Once the tank is free, disconnect the pulley, motor, and heating element from the structure. Then, using pliers, remove the two shock absorbers located on the surface. The vast majority of washing machines AEGs are equipped with non-separable tanks, so the element will have to be sawed off.
For the next step, you'll need a drill with a long 6mm drill bit, five 5mm mounting bolts, several 12-14mm screws, a degreaser, a water-resistant sealant, and a fine-toothed saw. The procedure is as follows:
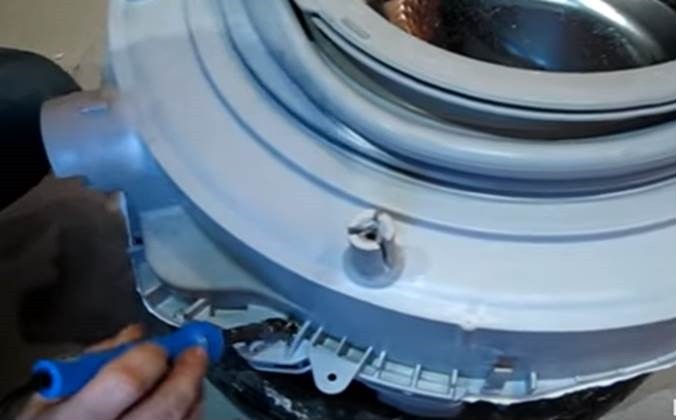
- Make 5 marks with a marker, so that when you assemble the tank you can use them to screw the bolts in the right place;
- Use a drill to make holes at the marked points;
- take a saw and make a cut exactly in the middle of the tank;
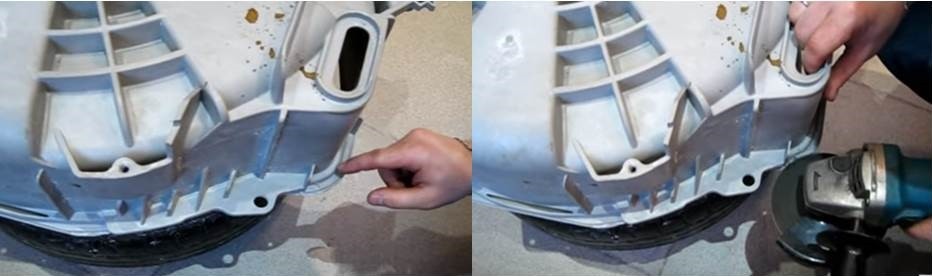
- Using a grinder or soldering iron, slightly deepen the wall of the tank lip, as shown in the picture. This will help you during further assembly;
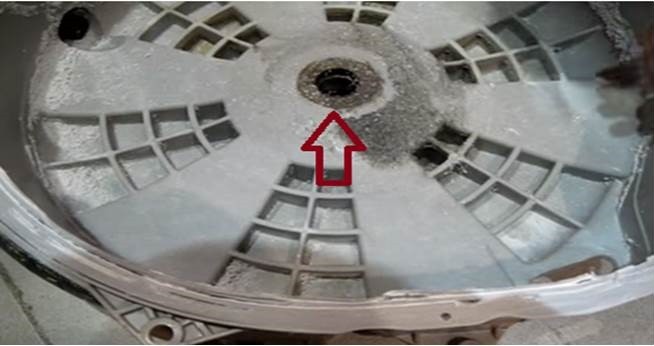
- Remove the drum from the tank housing and inspect the shaft for wear; there shouldn't be any. Clean the bushing if necessary.
Once the drum is set aside, you'll see where the bearings and seal are mounted. Now we'll move on to the next step of replacing the components.
We change bearings
Before removing the damaged parts, remove all dirt from the surface. To remove the old bearings and seal, you'll need a drift and a regular hammer. Insert one end of the drift into the seal area and gently tap the top edge of the drift with a hammer. This will easily remove the worn parts.
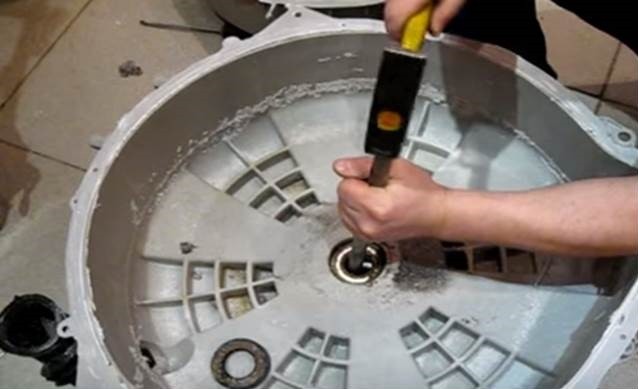
The inner bearing is knocked out into the tank, after which the tank must be turned over and the second, outer bearing must be removed.
Before installing new parts, it's best to clean the surface of the tub and drum. Once the parts are clean, you can begin installation. It's best to have a bearing puller for this procedure; this tool will allow you to carefully press the bearings back into place. However, if you don't have a bearing puller, you can use a flat punch.
Once the bearings are in place, the seal can be installed. Experts recommend coating the seal with regular superglue for a more secure fit. The sealing ring should be treated with a special lubricant for washing machine bearings and seals; it should completely fill the element's lip. It is also worth remembering to treat the drum bushing with lubricant.
The tank can now be reassembled. To do this, the saw cut seam is degreased around the entire circumference. The drum is then inserted into the tank. After degreasing, a heat-resistant sealant is applied in a continuous layer to the edges of both tank halves.
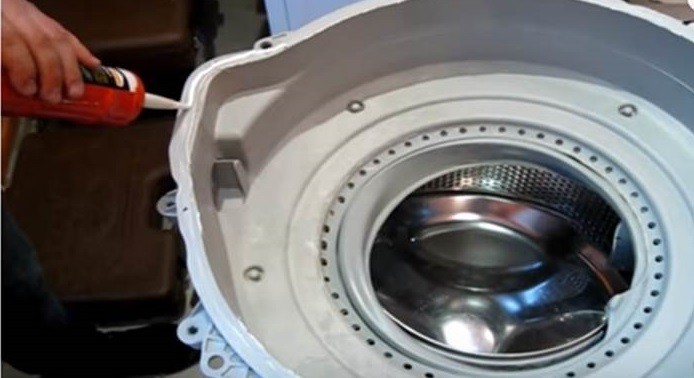
After the walls are coated, join the two halves of the tank. Then screw the mounting bolts into the holes marked at the beginning of the project. Prepare a soldering iron, screws, and a screwdriver. Using the soldering iron, make indentations in the connecting seam in a circle, approximately 5-8 cm apart. Then insert a screw into the hole and tighten it with a screwdriver.
The tank reassembly process is complete. All that remains is to reattach the previously removed motor, insert the heating element and pulley, and attach the drive belt. After that, the automatic washing machine is reassembled in the same order it was disassembled.
Interesting:


Readers' comments
Headings
Washing machine repair


For buyers


For users


Dishwasher


Add a comment