How to replace bearings and seals on an LG washing machine?
 If you've discovered that your "home helper" needs bearing and seal replacement, don't worry. In fact, even a non-professional can figure out the nature of the work ahead. The key is to have patience, time, the necessary tools, and follow the detailed repair instructions we'll provide. So, below, we'll explain how to replace components in an LG washing machine and what pitfalls you might encounter.
Let's collect materials and tools
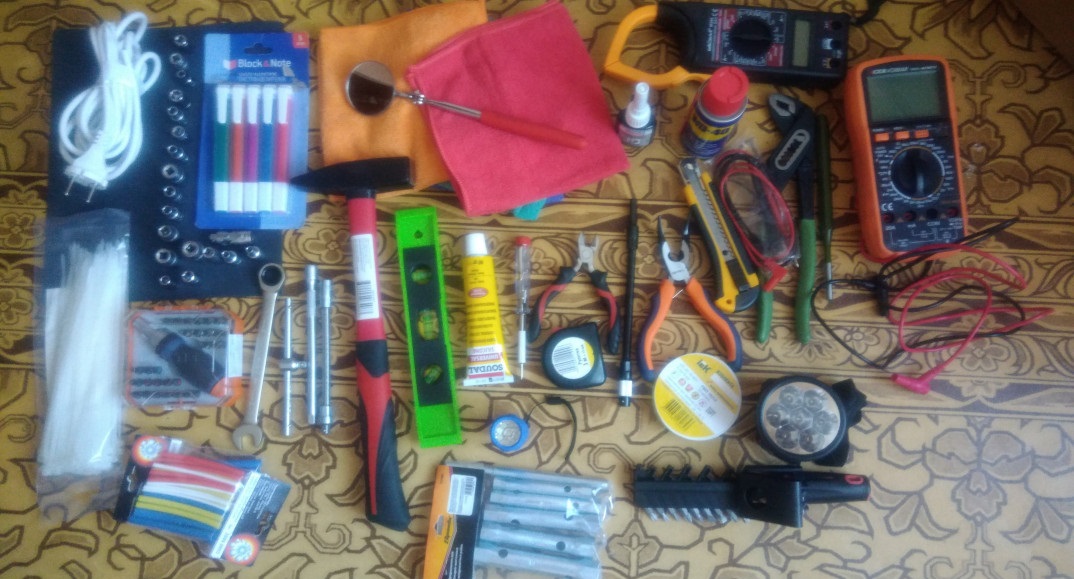
Proper preparation for repairs will save you time and stress during the upcoming work. To replace the drum bearings in an LG washing machine, you'll need a whole set of tools. You should have the following on hand:
- a pair of screwdrivers (slotted and Phillips);
- pliers;
- hammer with bronze striker;
- set of open-end wrenches;
- set of socket heads;
- metal rod;
- WD-40 aerosol lubricant;
- silicone sealant;
- special grease for seals and bearings.
Once you have determined that all the required tools are available, you need to purchase replacement parts. When selecting components, be sure to pay attention not only to the model of the washing machine, but also to the size of the seal and the type of bearings. The necessary information about the parts can be found in the technical data sheet of the equipment.
When purchasing spare parts at a specialty store, ask a salesperson for assistance. Provide the washing machine's serial number and component information. A specialist will help you select the correct bearings and seal size.
It's best to visit the store with the parts you need to replace already removed from the washing machine, so the chances of buying the wrong one are reduced to zero.
Avoid purchasing parts that aren't intended for this type of equipment. This increases the risk of having to repeat the repairs some time after installation. As for cost, original bearings cost around $3.50, and an O-ring costs around $3.
Once you've prepared your tools and replacement parts, you need to set up your workspace. Disassembling the machine in a cramped bathroom isn't an option; the ideal option is to move it to a garage or, at worst, a spacious room. If you're doing the DIY repairs in an apartment, be sure to protect the flooring by laying it down first.
It is important to free up as much space as possible so that nothing gets in the way when disassembling the washing machine and replacing components.
Removing the tank
The first step when replacing bearings and seals is to disassemble the washing machine. To remove the tank, you will have to remove the top cover and the front wall of the machine, and remove other system elements from the housing. The upcoming algorithm of actions will be as follows:
- Unscrew the 2 bolts holding the top cover of the case, remove it and put it aside;
- Remove the detergent dispenser. You can clean it immediately to remove any plaque and debris;
- Unscrew all fastening mechanisms that support the machine control panel;
- carefully, trying not to damage or tear off the wires, place the panel on top of the washing machine;
- remove the lower false panel of the case; to do this, bend back the special latches using a screwdriver;
- loosen the metal clamp that encircles the tank cuff and remove the ring;
- disconnect the contacts of the hatch locking device and remove the sensor;
- Next, you need to remove the bolts holding the front panel of the housing. Look for screws behind the drain valve, the drain pan, the top right and left sides of the housing, the bottom right, and behind the control panel. Now removing the front panel of the washing machine will be easy.
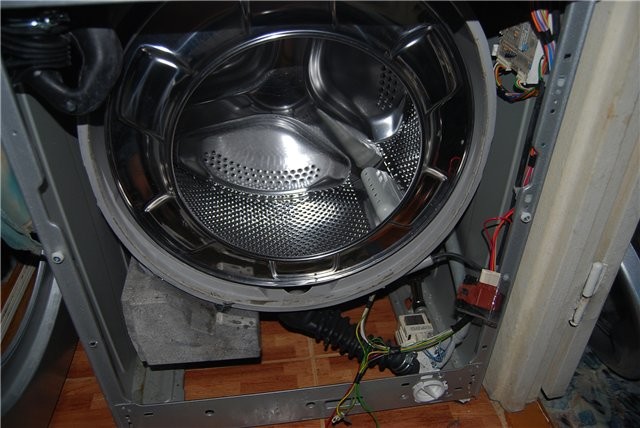
The job is almost complete; the drum is now accessible. Next, you need to disconnect the wiring connecting the drum to the other components of the washing machine and remove the fasteners. This involves:
- fastening the filling valve;
- drain pipe;
- wires leading to the heating element;
- electric motor wiring;
- cables of the water pump;
- counterweight mountings;
- pressure switch pipe;
- shock-absorbing elements.
Once everything that can be disconnected from the tank has been removed, it needs to be removed from the housing. Call an assistant for this step. The first person should press down on the springs, while the second removes the part. With a lot of effort, this task can be accomplished alone.
Tank disassembly procedure
The washing machine's tub consists of two halves joined together. To separate the halves, you must remove all the bolts and release the special fasteners.
If any fasteners are difficult to remove, you can treat them with WD-40 aerosol lubricant.
Once the main mounting screw is removed, remove the drum pulley and replace the bolt. Next, place a prepared metal rod on the bolt and gently tap it with a hammer to knock out the shaft. It's important not to damage the shaft, otherwise, a DIY repair will be costly.
We replace damaged parts
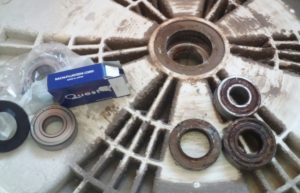
Once the tank has been disassembled into two halves, you can proceed to removing worn components and installing new ones. Further work will be performed on the rear half of the drum unit. In the middle, you'll see an O-ring, or seal. Use a screwdriver to remove it from its seat.
The bearings will need to be knocked out using the same metal rod. Place the end of the rod on the edge of the bearing and tap it with a hammer. Repeat this process several times, around the entire circumference of the part, until the elements are removed.
To minimize the risk of damage to the mechanism, you can use a special puller, but this will increase the cost of repairs.
The opened hole should be thoroughly cleaned of metal shavings, a layer of oil and other dirt. It is important to install new bearings and seals in a prepared, clean place.
Now it's time to take the new components and prepare them for installation. Don't forget to apply special grease to the mounting area. The bearings are driven into their original locations. To ensure proper installation of the seal, coat it with a generous layer of lubricant. This will prevent water from getting on the bearings.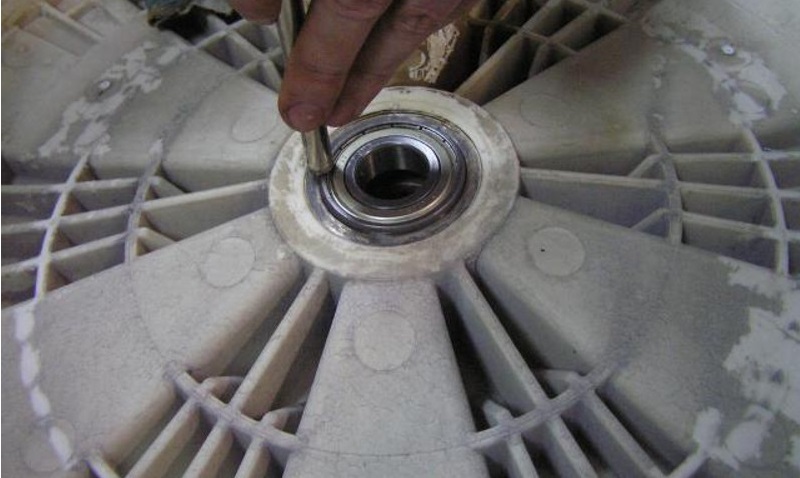
You can also lubricate the washing machine's spindle. Just remember to run the machine empty a couple of times to prevent soiling the laundry. Reassemble the drum and the washing machine in reverse order.
When joining the drum halves, use a water-resistant sealant to ensure a secure fit. Once the machine is fully assembled, test the machine's functionality. Plug it in and run a dry cycle (without loading any items).
What problems may arise?
If you're disassembling and repairing a washing machine for the first time, there's a risk of making some mistakes. To prevent an unfortunate oversight from leading to malfunction and increased repair costs, it's best to familiarize yourself with the most common mistakes made by beginners.
- The wiring of the hatch locking device simply breaks when the front wall is removed carelessly.
- The door cuff becomes unusable due to it being “torn” out of the housing with great force, without the metal clamp being pulled out.
- The tank pulley is damaged when it is removed from the axle carelessly.
- Fasteners that are not pre-treated with WD-40 lubricant and are removed by technicians with great force are damaged.
- The wires leading to the temperature sensor are torn off.
- The water inlet pipe is torn out, along with the inlet hose.
- The drum is damaged when the bearings are knocked out carelessly. As a result, the drum has to be replaced completely, which increases the cost of repairs several times.
Before attempting a replacement, carefully consider whether you're up to the task. If you're unsure of your ability, it's best to trust a professional. In this case, the service fee will start at $45, but you'll receive a warranty on the repair. The final cost depends on the equipment model, the type of tank (separable or cast), the cost of parts, the complexity of the work, the urgency of the job, etc.
Interesting:


Readers' comments
Headings
Washing machine repair


For buyers


For users


Dishwasher


Add a comment