How to Replace a Dryer Belt
 A broken drive belt stops the dryer from spinning—the drum stops spinning. A stretched rubber band reduces the drying efficiency of clothes. Therefore, in both cases, the machine will need repair.
Is it possible to replace a dryer belt at home? Why does the belt become damaged? How can you prevent it from stretching? Let's explore the nuances.
Removing the damaged belt
How can you tell if there's a problem with the drive belt? If this happens, the drum will spin intermittently, stop periodically, and won't maintain its rhythm. Items will remain damp at the end of the cycle.
Modern dryers with self-diagnostic systems will display a fault code on the screen. The error code can be easily deciphered using the equipment manual. You can replace the drive belt yourself, without calling a technician.
Before starting work, be sure to unplug the dryer.
First, you need to remove the damaged belt. This is done as follows:
- Move the dryer away from the wall and furniture to ensure unobstructed access to all sides of the unit;
- remove the lint filter from the machine (this will be necessary if it is installed on top of the housing);
- remove the side panels of the dryer body (after removing the fasteners, these may be screws or buttons, depending on the model of the washing machine);
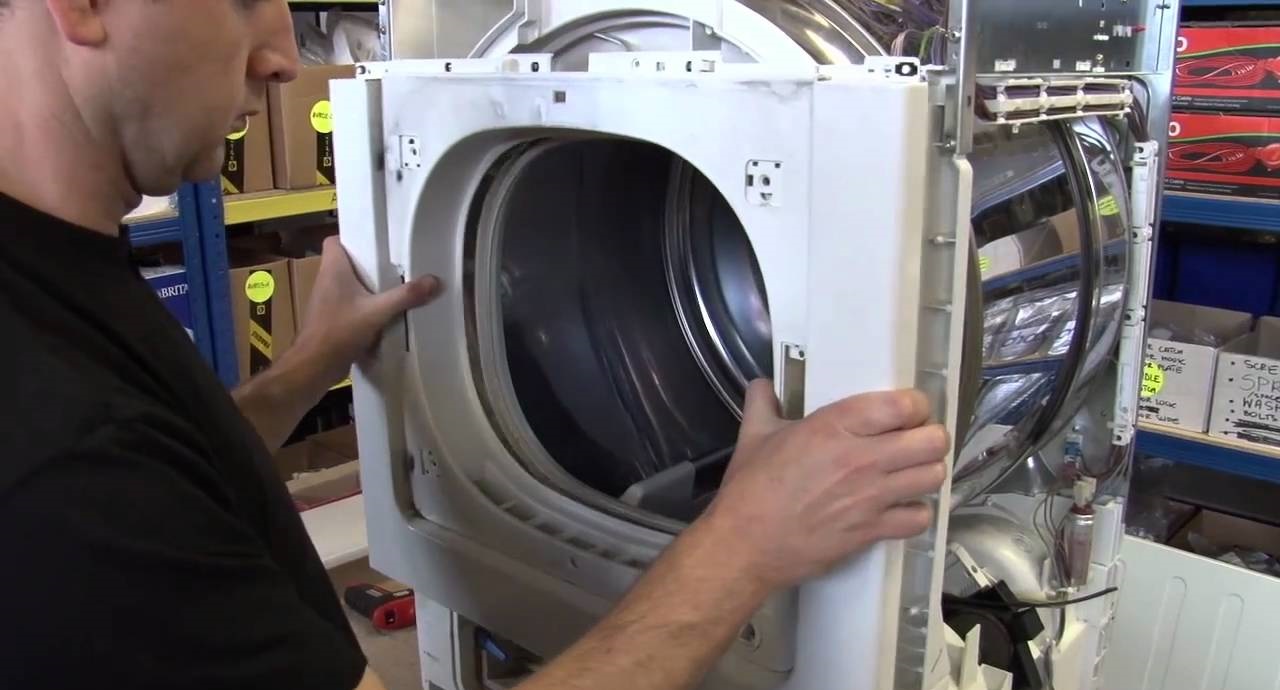
- remove the top panel of the dryer body (for convenience, you can slide a flat-head screwdriver or knife under it and carefully unfasten all the cover clips);
- remove the back panel of the case.
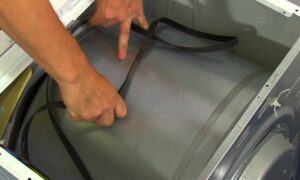
By partially disassembling the housing, you can access the drive belt. In some cases, the rubber band may have already broken off and be lying underneath. It should be lifted and discarded.
If the drive belt is attached to the drum, simply pull it tight by hand. This completes the removal process. Now you can install the new belt.
Installation of a new part
You can order parts before starting the repair. In this case, you'll need to use the dryer's model and serial number. If you are afraid of making a mistake, it is better to first remove the old belt, look at its markings, and then buy a new one.
Typically, purchasing dryer components is straightforward. However, a car belt can also be used as a substitute. The key is to make sure it's the same diameter. If there are more creases, they can be carefully trimmed to prevent the elastic from slipping.
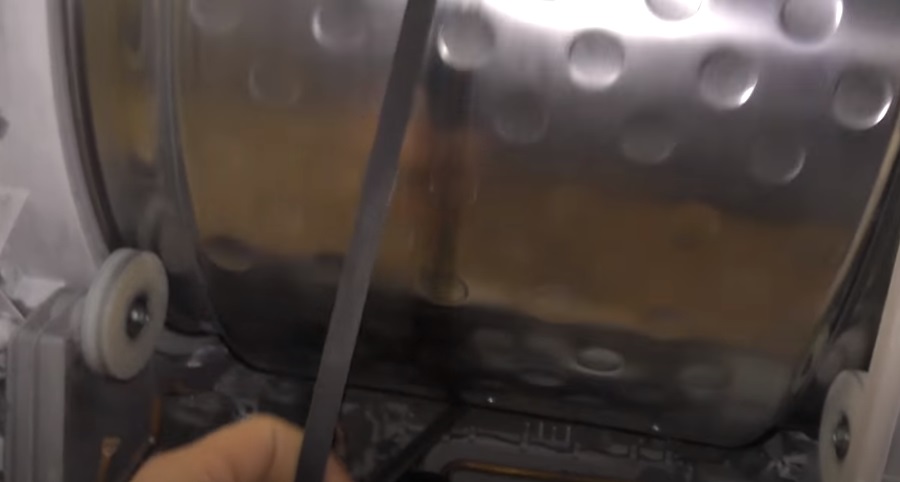
How to install a new rubber band? Wrap the band around the drum, making sure it fits into the designated groove. Next steps:
- pass the drive belt around the engine pulley;
- wrap the rubber band around the tension pulley (it is located directly above the engine “wheel”) – this will make the belt “fit” tightly;
- Turn the drum by hand to check the belt tension;
- put the top panel of the case back in place and connect the previously removed wires to it;
- Press down on the CM cover to secure the clamps;
- put the side walls of the case back in place and secure them.
Now you need to push the dryer back in and plug it in. To check, run an empty test cycle (without items in the chamber). The drum should rotate smoothly, without any unusual noise.
If the cycle runs smoothly, the repair is complete. To ensure the drive belt lasts as long as possible, it's important to follow the basic rules for operating the dryer. Specifically, avoid overloading the appliance and clean the filters and other components regularly.
Causes of belt damage
If the reason why the drive belt failed is not identified, the new rubber will also become unusable after a short period of time. Before replacing the drive belt, you need to diagnose the dryer. What can cause an element to go bad?
- Problems with drum rollers.
- Clogged ventilation wheel.
- Accumulation of dust and dirt in the lint filters.
- Damage to the felt seal.
- The user has exceeded the maximum permissible drum loading weight.
- Initially, the belt was installed incorrectly, when the required elastic tension was not ensured.
- Natural wear and tear.

Let's look at each reason in more detail. Dryers are equipped with drum rollers, which help the drum rotate. These rollers distribute the load evenly and prevent the load from falling solely on the motor and drive belt.
Over time, rollers wear out and develop flat spots. When rotating, they lose their grip on the drum for a few seconds. This places increased stress on the dryer's drive belt, causing it to stretch or break.
If you simply replace the belt without determining why it failed, the problem will recur over time. To completely resolve the issue, be sure to install not only a new belt but also new drum rollers.
The fan wheel is not connected to the drive belt. However, if the fan is clogged, heat distribution inside the dryer will be uneven.
Some of the heat will escape from behind the fan and reach various parts of the dryer, including the belt. The belt will heat up, expand, and slip. This can also create additional resistance. All of this accelerates drive belt wear.
Another possible cause is a buildup of debris in the lint filter. All dust, threads, hairs from clothing, and small fabric fibers end up in a special container. This needs to be cleaned regularly.
The lint filter should be cleaned every 3-5 cycles.
If you don't clean the lint filter, dust clumps will interfere with the dryer's operation. Lint will then get caught in other dryer components. This can create additional friction points, which will increase the load on the drive belt.
The next thing to check is the felt seal. It's located inside the dryer door. This "cushion" is designed to reduce friction caused by the rotation of the dryer drum.
When the felt seal becomes damaged, the dryer drum begins to rub against the front panel. This friction places additional stress on the motor and drive belt. Therefore, make sure the seal is intact.
It is not without reason that the manufacturer sets the maximum permissible weight of laundry that can be loaded into the drum. The most common reason why the drive belt breaks or stretches is systematic overloading of the dryer. For example, a dryer is designed for 5 kg of cotton, while the user constantly tamps all 7 kg of laundry into it.
What does this mean? The dryer isn't designed to handle such a heavy load. The strain on all the machine's components immediately increases. Shock absorbers, bearings, the drum pulley, the drive belt, and other components all suffer. Therefore, it's important to adhere to the manufacturer's maximum load weight.
The belt will stretch and break if it's installed too loosely, without tension, or, conversely, too tightly. This will cause the drum to rotate incorrectly, which will cause the rubber to wear out faster.
Finally, belt damage can be caused by natural wear and tear. The rubber belt has a limited lifespan—5-7 years. The element drives the drum through friction. As it contacts the pulley, it gradually stretches, eventually slipping or breaking.
Anyone can replace a dryer's drive belt; there's no need to call a technician. The only tool you'll need is a screwdriver. The entire job takes 20-30 minutes. However, before installing a new component, be sure to fix the underlying cause of the failure.
Interesting:


Readers' comments
Headings
Washing machine repair


For buyers


For users


Dishwasher


Add a comment