How to make a grain crusher from a washing machine
 A grain crusher is an indispensable tool for a small farm, as grain is the basis for livestock feed, and preparing it manually each time is extremely labor-intensive. You can purchase a factory-made grain crusher for a considerable price, or you can make a productive device yourself from an old washing machine, which will be just as effective. We'll discuss how to do this below.
Does it make sense to turn a washing machine into a grain crusher?
For those looking for an easy way out, the simplest option is to go to the nearest store that sells such equipment and purchase a grain crusher with sufficient capacity. Of course, this will cost you a bit, but the results are guaranteed. But in our opinion, it's better to make such a device yourself. It will allow you to express your creativity, save money, and, overall, give you something to look back on.
 It's also important to understand that by creating a homemade product with your own hands, you're giving a second life to an old washing machine, getting rid of old junk, and turning it into something useful. Moreover, you'll gain new knowledge and skills that will certainly be useful in life. Don't think we're forcing anyone to get involved in DIY projects; if you've never had close contact with technology and have no interest in it, no one will be able to motivate you to take it up. But if you've already made something with your own hands, no additional motivation is needed.
It's possible to turn a used washing machine into more than just a grain crusher; you'll see for yourself after reading other articles on our website. Specifically, our experts suggest making emery from a washing machine, a concrete mixer and other useful things that will definitely come in handy around the house.
Please note! The grain crusher design we offer requires minimal modification to a similarly designed Oka-type "washer" or other round machine.
The structure of a grain crusher and its components
The basis of our grain crusher will be an Oka washing machine, which we won't even disassemble. The only thing we'll need to do is remove the activator, or rather its rotating plastic part; we'll need the rest. Let's unscrew the activator and set the machine aside for now. Now let's gather the tools we'll need:
- drill;
- set of drills;
- pliers;
- set of open-end and socket wrenches;
- Bulgarian;
- chisel;
- hammer.
We'll also need some components that will allow us to modify our machine slightly. These include bolts and nuts of various sizes, a pruning shear, a bushing and flange, a metal and rubber gasket, and a fine-grained screen (2-3 mm).
Now that we've sorted out the tools and components, let's look at the general concept and design of the future grain crusher. The unit will be very spacious, as the entire wash tank is dedicated to the grain bin. Instead of an activator, there will be knives for grinding grain, and a fine-grained restrictive grid will prevent uncrushed grain from jumping out of the hopper. Only crushed grain will pass through such a grate, roll through a special funnel and end up in a bucket placed in advance.
Important! Grain poured into the hopper, also known as the washing tank, will gradually sink, and the crushed grain will exit.
Assembling the unit
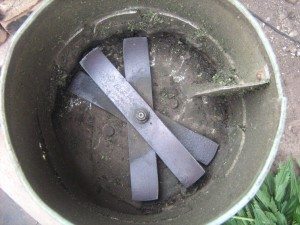 Let's begin building our own grain crusher. We'll start with the simplest part – installing the crusher blades. We'll need to mount the blade on a 6 cm thick pulley. To do this, we'll need to make or select a flange that will fit onto the pulley on one side and secure the blade on the other (the type of flange will depend on the specific machine model and the type of crusher blade).
Once the blade is in place, we'll need to ensure that flour and grain particles don't get caught in the grinder's drive mechanism. To do this, we'll cut a patch out of tin and screw it onto the grinder's bushing. Then, we'll place a rubber patch on top. Make sure that the patches do not interfere with the rotation of the mechanism.
Important! To further protect the mechanism from flour dust, you can additionally seal the rubber gasket with silicone sealant.
Now let's create a funnel to drain the crushed grain. As you know, the washing machine drain is located at the lowest point of the tub. Let's take advantage of this and turn the drain hole into a grain drain.
- Using a chisel and hammer, we widen the drain hole so that its diameter becomes 12-15 cm.
- We take a piece of pipe of the appropriate diameter and insert it into the enlarged hole
- We move the pipe to the side. Now the crushed grain will exit the hopper and pour into a container.
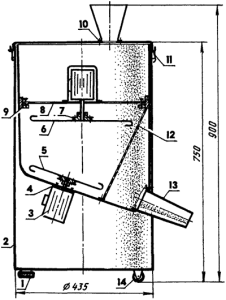 Next The most difficult stage is to secure the fine-grain grate at the correct angle in the bin, ensuring there are no gaps between the edges of the grate and the bin walls. Otherwise, the grain will slip through the cracks and end up in the same container as the fine-grained material. You need to do the following:
- Determine the radius of rotation of the shredder blades and make a mark at the maximum point.
- Step back a little from the mark you made and draw a straight line - this is the border where you need to install the fine-grain grate.
- Now your task is to cut the grate so that it fits perfectly at an angle from wall to wall of the bunker, with virtually no gaps. This will create a complex shape that will need to be securely fastened.
- We screw the grate to the bunker walls as securely as possible. If possible, we can even weld it.
- We seal the cracks with cold welding or automotive sealant and let it dry.
Now that you've successfully built your own grain crusher, it's time to test it. Set the control panel to the maximum rotation mode for about 3 minutes and start the grain crusher. Watch the blade rotate and listen for any unusual sounds. Then, check the motor's temperature and the drive mechanism for excessive friction.
Once you've verified all of this, you can begin the first "field tests" of our grain crusher. Fill the hopper with grain, cover it with a standard washing machine lid, and start the machine. Don't forget to place a container underneath to catch the crushed grain. That's it, we hope you'll have a blast!
Interesting:


Readers' comments
Headings
Washing machine repair


For buyers


For users


Dishwasher


Add a comment